
There is a particular moment every autumn when clients start pulling out their chunky knits, and almost without fail, someone sits in my chair and asks for a sweater nail design. It happens like clockwork every single year, and honestly, I never get tired of it. There is something so satisfying about recreating the texture of a cable knit sweater on something as small as a fingernail.
I remember the first time a client showed me a photo of a fisherman knit sweater and asked if I could somehow paint that pattern onto her nails. At the time it felt like a strange challenge, but once I figured out the technique, sweater nail design quickly became one of the most requested styles in my studio during the colder months.
In this guide I want to share everything I have learned about sweater nail design over the years, from the tools that actually work to the small tricks that make the texture look believable rather than messy. Whether you want a full cable knit effect or something more subtle like a simple ribbed pattern, this article covers it all in detail.
Also Read: Business Nail Ideas That Look Polished, Professional And Powerful Every Single Day
Why Sweater Nail Design Has Become A Cold Weather Favorite
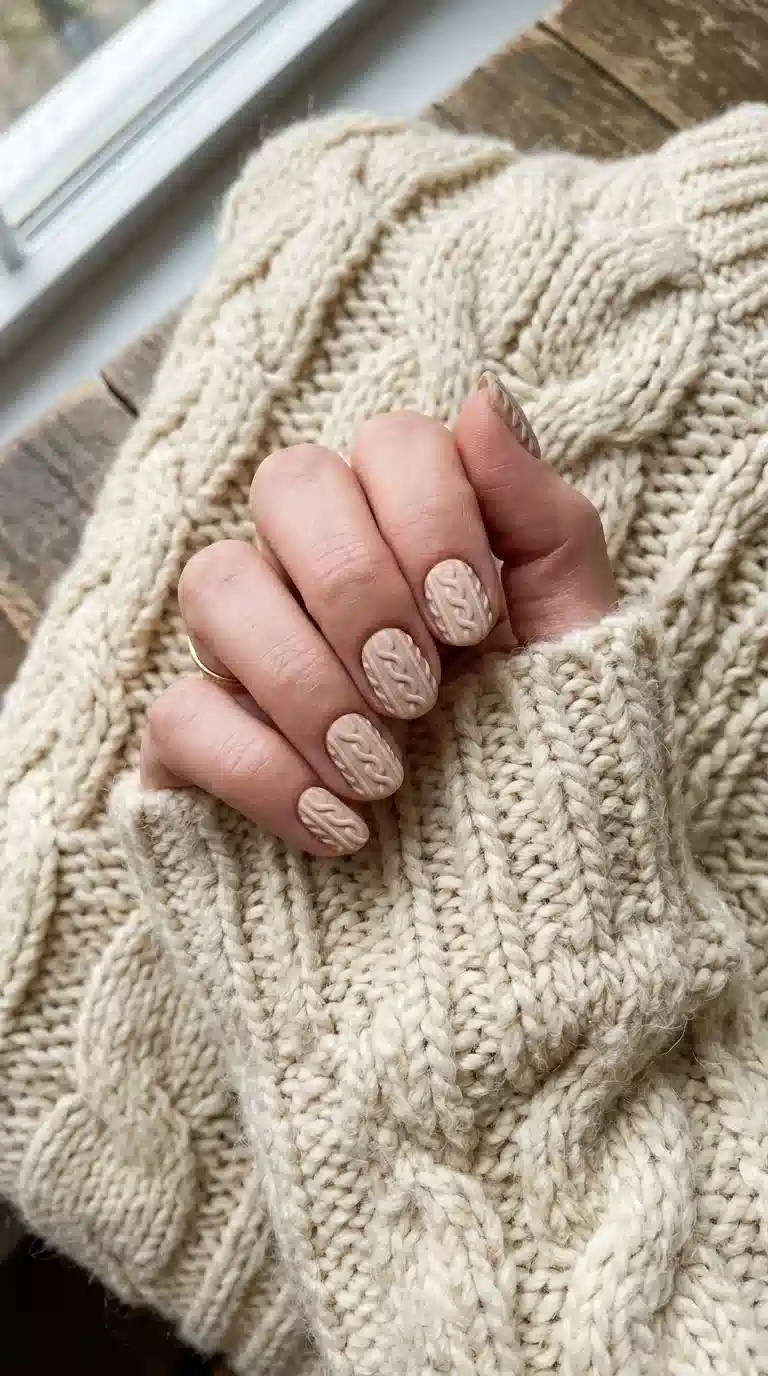
Sweater nail design has grown into one of the most requested autumn and winter looks in my studio, and I think the reason is pretty simple. It taps directly into the feeling of the season itself. Chunky sweaters, warm drinks, soft blankets, all of that cozy energy translates beautifully onto the nail when you recreate a knitted texture.
There is also something visually satisfying about the pattern itself. A cable knit or ribbed texture catches the light in a way that flat polish simply cannot replicate, which makes sweater nail design stand out immediately compared to a regular solid manicure. It looks handmade and detailed without necessarily requiring bright colors or bold shapes.
From a professional point of view, I also think this trend has stuck around because it works so well with neutral, muted color palettes that are already popular in fall and winter fashion. Sweater nail design fits naturally into an outfit built around beige, cream, camel or deep burgundy tones, which makes it an easy sell for clients who want something seasonal without going overboard on color.
My Experience Perfecting Sweater Nail Design Behind The Chair
The first few times I attempted sweater nail design, I will admit the results were not exactly what I had pictured. Getting a raised texture to look like actual knitted fabric rather than random bumps took a fair amount of practice and quite a few frustrating attempts on the nail wheel before I felt confident enough to try it on an actual client.
Over time, I developed a rhythm for creating the cable knit pattern using a thin gel line technique, building up crossed strands one layer at a time until the design actually resembled woven yarn. What surprised me most is how much clients loved watching the process happen in real time. Sweater nail design tends to be one of those appointments where people are genuinely curious about the technique itself, not just the finished result.
These days, sweater nail design has become second nature to me, but I still remember how tricky it felt in the beginning. That experience is exactly why I wanted to write such a detailed guide, because I know how confusing it can feel trying to recreate this look without proper guidance the first time around.
Choosing The Right Colors For Sweater Nail Design
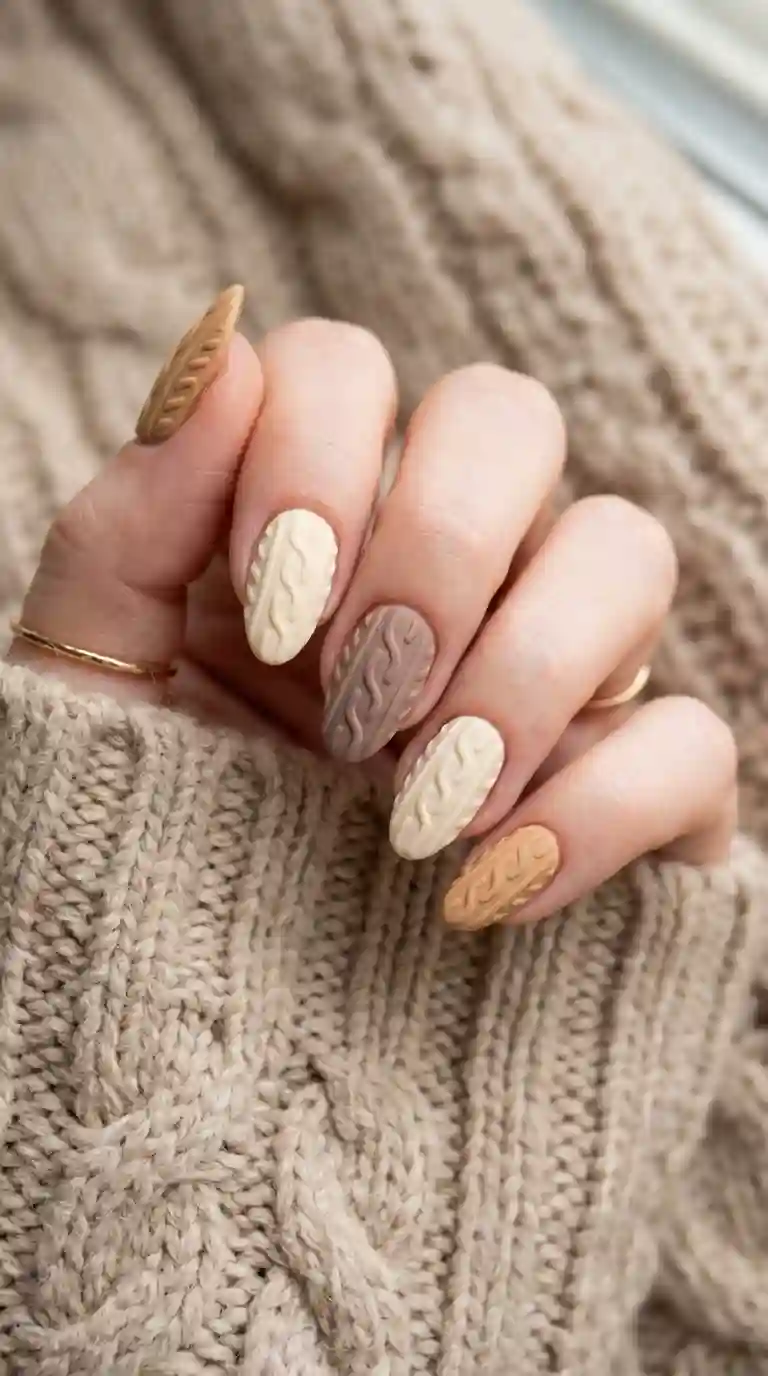
Color choice makes a huge difference in how believable your sweater nail design ends up looking. I almost always steer clients toward warm neutral tones, since these shades most closely resemble the natural fibers found in real knitted sweaters. Cream, camel, soft beige, oatmeal and warm taupe tend to be my most requested base colors for this style.
That said, sweater nail design does not have to stay strictly neutral. Deep burgundy, forest green and even a soft dusty blue can all work beautifully, especially for clients who want something a bit more colorful while still keeping that cozy, knitted feel. The key is choosing a matte or slightly muted finish rather than anything glossy or bright, since shine tends to work against the fabric like texture you are trying to create.
Must Read : Gemini Birthday Nails: Dazzling Zodiac Inspired Manicure Ideas To Celebrate Your Special Day
Matte Finishes Work Best For Sweater Nail Design
I always recommend a matte topcoat for sweater nail design, and this is not just personal preference. Matte polish diffuses light in a way that mimics the soft, fuzzy texture of real yarn far better than a glossy finish does. Glossy polish tends to reflect too much light, which can actually make the raised texture look plasticky rather than fabric like.
Once you try a matte topcoat over your finished sweater nail design, the difference becomes really obvious. The whole manicure suddenly reads as soft and knitted rather than sculptural, which is exactly the effect you want for this particular style.
The Classic Cable Knit Sweater Nail Design
The cable knit pattern is probably the most iconic version of sweater nail design, and it is the one clients request most often in my studio. This pattern involves creating a series of crossed, twisted lines that mimic the look of a traditional cable knit sweater, the kind with those braided vertical columns running up the front.
To achieve this look, I use a thin gel liner or acrylic paint to build up raised lines in a crossing pattern, working in small sections rather than trying to complete the whole design in one pass. Each crossing point needs to slightly overlap the previous line to create that woven, three dimensional effect that makes cable knit sweater nail design so recognizable.
This particular style takes the most time and patience out of all the sweater nail design variations, but it also tends to be the most impressive once finished. Clients are often amazed at how closely it resembles an actual sweater once the design is complete.
Ribbed Sweater Nail Design For A Simpler Look
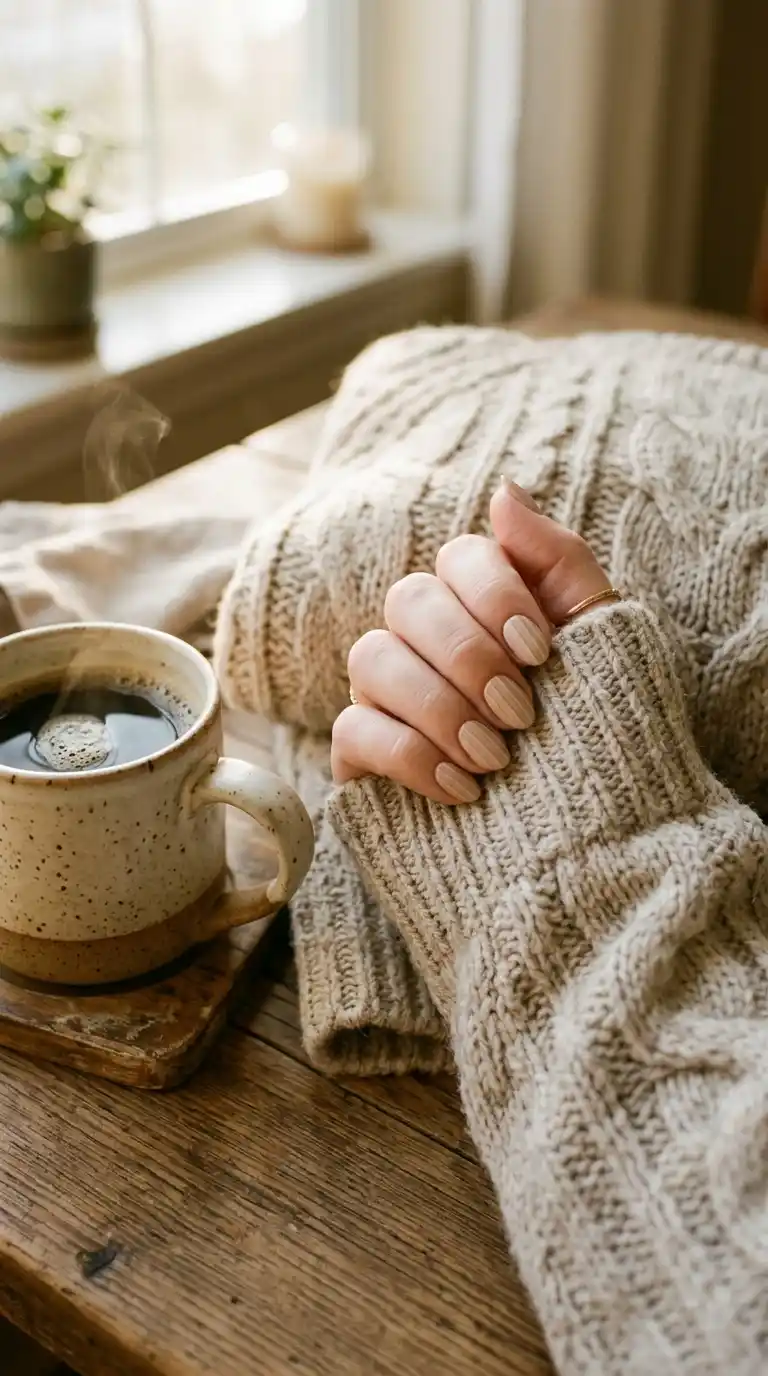
Not everyone wants the intricate detail of a full cable knit pattern, and that is completely understandable. A ribbed sweater nail design offers a simpler alternative that still captures the cozy, knitted feeling without requiring quite as much time or precision.
For this style, I create thin, evenly spaced vertical lines across the nail using a raised gel technique, similar to the ribbing you would see along the cuffs or hem of a real sweater. This version of sweater nail design tends to be quicker to apply and works especially well for clients who want something textured but still fairly subtle for everyday wear.
I often recommend ribbed sweater nail design to clients trying this trend for the first time, since it gives a taste of the texture without the longer appointment time that a full cable knit pattern typically requires.
Read Also: Exotic Nail Ideas That Turn Every Manicure Into A Statement Worth Chasing
Fair Isle Inspired Sweater Nail Design
For clients who love a bit more color and pattern, a fair isle inspired sweater nail design is always a fun option. This style borrows from the classic colorful knitwear pattern often seen during the holiday season, featuring small geometric shapes like snowflakes, diamonds or stars arranged in repeating rows.
Unlike the raised texture of cable knit designs, fair isle sweater nail design usually stays flat, relying on color and pattern rather than dimension to create that knitted appearance. I typically use a base color like cream or deep red, then add small painted shapes in a contrasting color across each nail to mimic the repeating pattern found in traditional fair isle knitwear.
This version of sweater nail design tends to be especially popular around the holidays, since the pattern naturally reads as festive without needing any additional seasonal imagery like snowflakes or ornaments layered on top.
How To Create A Raised Texture For Sweater Nail Design
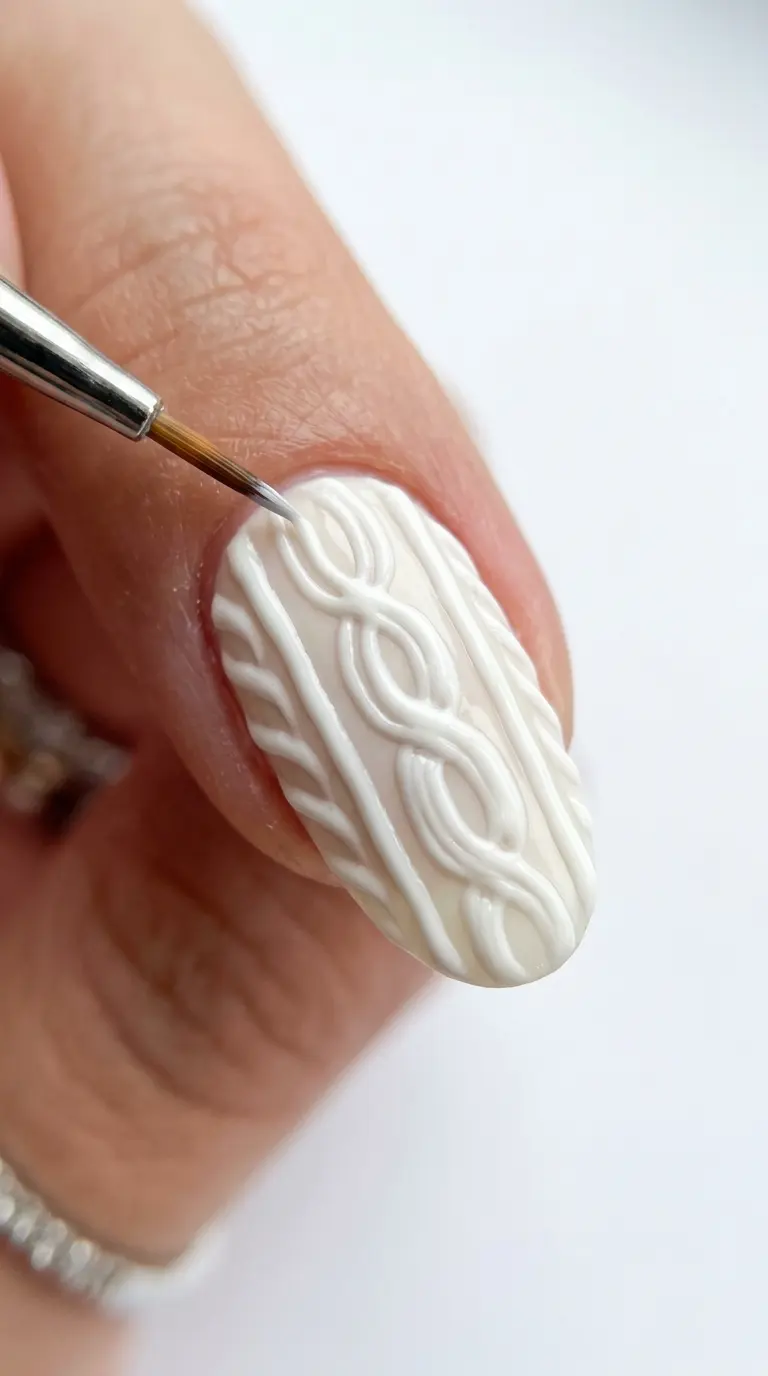
The raised texture is really what sets sweater nail design apart from a regular painted manicure, and getting it right takes a bit of technique. I usually build the texture using either gel polish cured in thin layers, or a specialized texture paste designed specifically for three dimensional nail art.
Starting with a smooth, fully dried base color, I use a thin detail brush to draw the first set of lines, cure them under a UV lamp if working with gel, then go back over certain sections to build up additional height where needed. This layering process is what creates that believable woven look rather than a flat printed pattern.
Patience really is the most important ingredient here. Rushing through the layering process for sweater nail design almost always results in a texture that looks lumpy or uneven rather than intentionally woven, so taking your time with each layer genuinely makes a noticeable difference in the final result.
Tools That Make Texture Easier To Achieve
A thin, pointed detail brush is essential for creating clean lines in sweater nail design. I also keep a dotting tool on hand for smaller accent details, along with a UV lamp for curing gel based texture work between layers. Some nail artists also use specialized 3D texture gels, which are formulated specifically to hold their shape and create raised effects more easily than standard gel polish.
Sweater Nail Design For Short Nails
A lot of people assume that textured designs only work on longer nails, but sweater nail design actually translates beautifully onto shorter nail beds as well. The key is scaling the pattern down slightly and keeping the lines a bit closer together so the texture still reads clearly on a smaller surface.
For shorter nails, I often simplify the cable knit pattern into just two or three crossing points rather than a longer repeating sequence, which keeps the design proportionate without feeling cramped. A simple ribbed texture also works wonderfully on shorter nails, since the straight vertical lines naturally scale down without losing their overall effect.
I have found that warm neutral tones tend to look especially good on shorter nails when paired with this texture, since the combination feels soft and cozy without overwhelming a smaller nail bed.
Also Read : Plant Nails: The Ultimate Guide To Growing The Prettiest Botanical Nail Art At Home
Sweater Nail Design For Long And Almond Shaped Nails
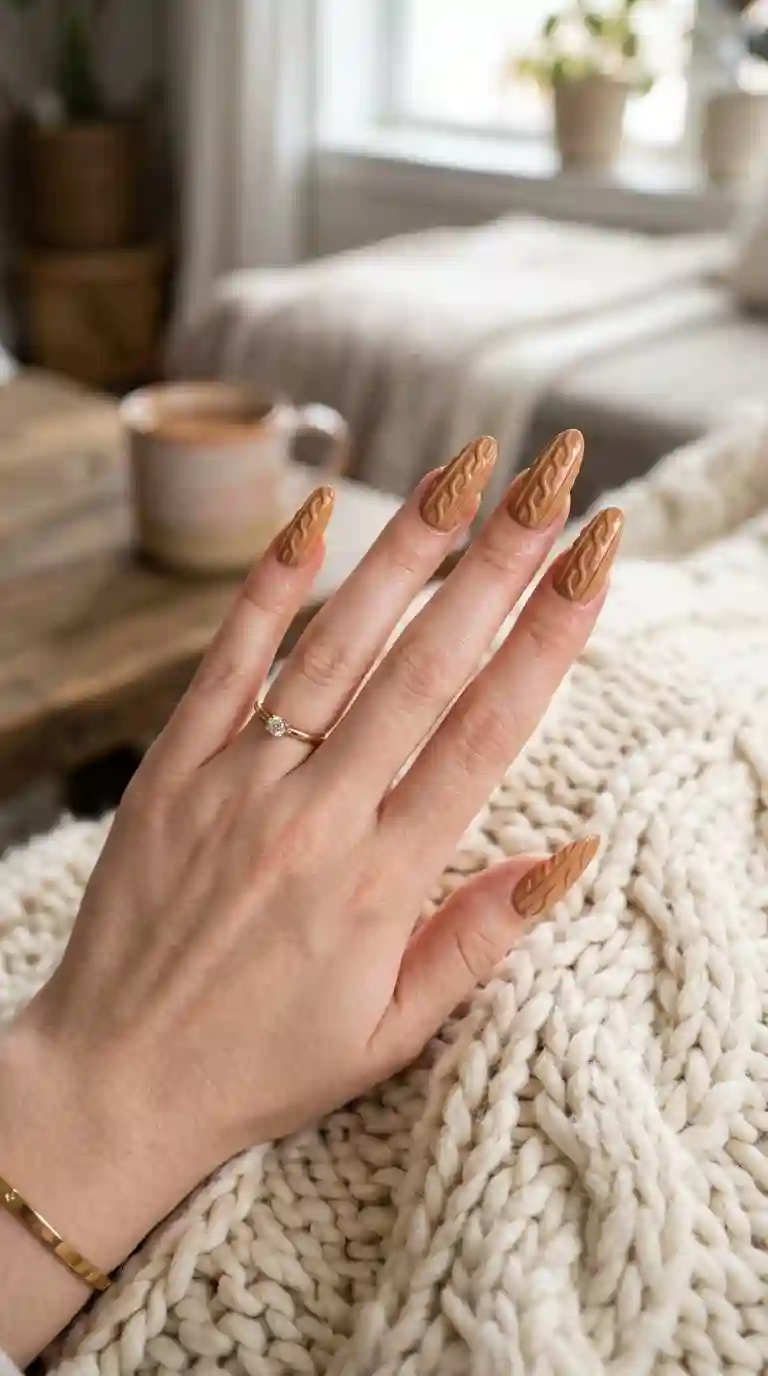
Longer, almond shaped nails give considerably more room to work with when it comes to sweater nail design. I love using the extra length to create more elaborate cable knit patterns, sometimes even combining two different textures on the same nail, like a ribbed edge near the cuticle transitioning into a cable knit pattern toward the tip.
With longer nails, there is also more opportunity to play with negative space. Leaving a small unpainted section near the cuticle, styled to resemble the folded cuff of a real sweater, adds a clever visual detail that elevates the overall sweater nail design without requiring any additional color or embellishment.
Coffin shaped nails in particular provide a wide, flat surface that showcases the raised texture beautifully from nearly every angle, which is part of why so many clients with longer nails specifically request this style during the fall and winter months.
Two Tone Sweater Nail Design For Extra Dimension
One technique I love using to elevate sweater nail design is incorporating two complementary tones rather than sticking to a single flat color. Painting the base in a warm cream, then building the raised texture on top using a slightly darker taupe or camel shade, creates subtle shadowing that makes the pattern pop even more.
This two tone approach mimics the way real knitted fabric naturally catches shadow and light across its raised stitches, giving sweater nail design an even more realistic, three dimensional appearance. It does take a bit more precision to execute, since you need to keep the darker texture color contained within the raised lines rather than bleeding into the base color underneath.
Sweater Nail Design With A Single Accent Nail
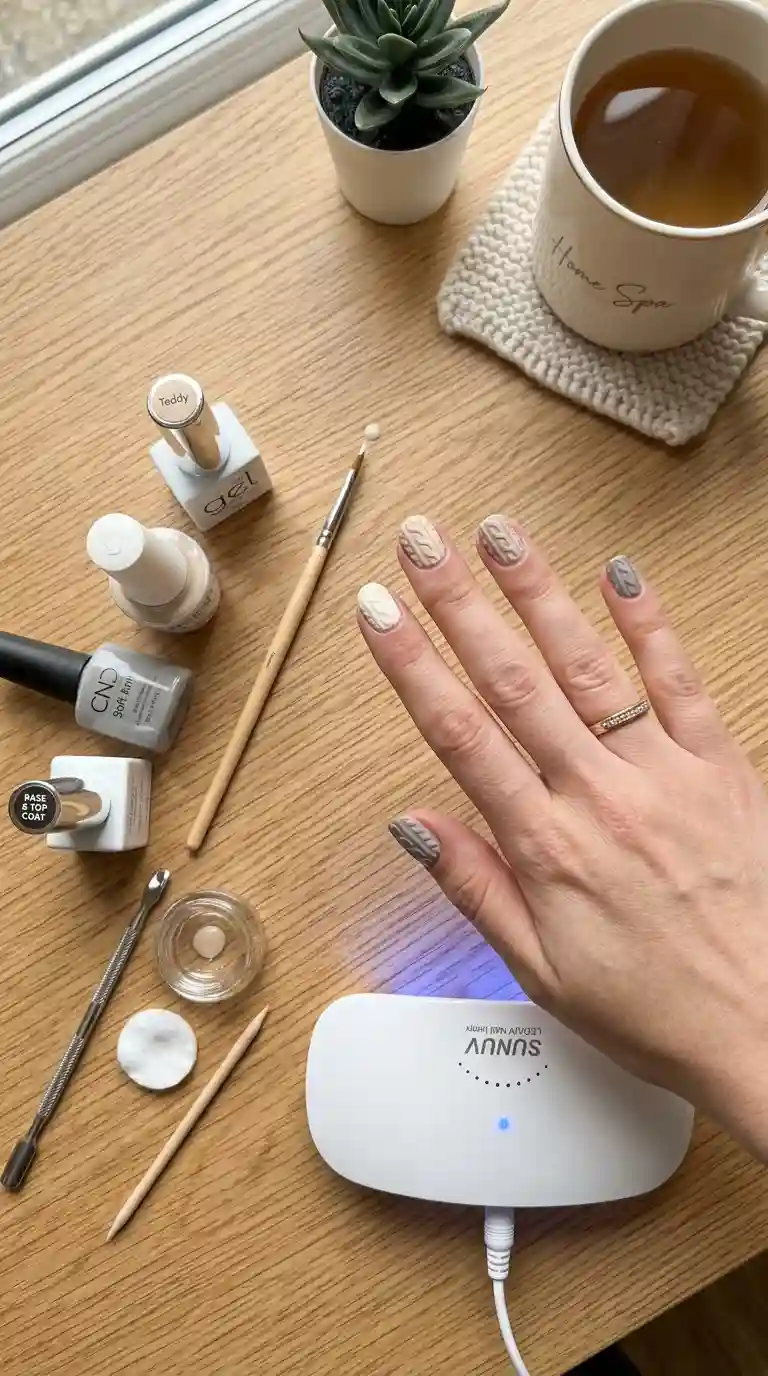
Not every client wants a fully textured set across all ten nails, and that is completely reasonable given how much time the technique requires. A really popular alternative is limiting sweater nail design to just one or two accent nails, usually the ring finger, while keeping the remaining nails in a simple, complementary solid color.
This approach gives clients the cozy, textured look they want without the longer appointment time or higher cost associated with a full set of textured nails. It also tends to look incredibly chic, since the contrast between the smooth solid nails and the single textured accent draws attention in a really elegant, intentional way.
I often recommend this version of sweater nail design to first time clients who want to try the trend without fully committing to the more involved full set option.
Sweater Nail Design For Acrylic And Gel Extensions
Clients frequently ask whether sweater nail design works well on acrylic or gel extensions, and the answer is absolutely yes. In fact, extensions often provide an even better surface for this kind of textured nail art, since the nail shape and length can be customized before any base color or texture work even begins.
For acrylic sets, I typically recommend a medium length almond or coffin shape, which gives enough surface area to showcase a detailed cable knit pattern without becoming impractical for daily wear. Gel extensions offer a slightly more flexible, natural feel while still providing plenty of room for raised texture work.
Regardless of which extension type you choose, the application process for sweater nail design stays fairly similar. A smooth, evenly cured base is essential before starting any texture work, since imperfections in the base layer tend to show through and disrupt the clean lines needed for a believable knit pattern.
Read Also : 50 Cool Nail Designs That Will Make Your Manicure Absolutely Unforgettable
How To Recreate Sweater Nail Design At Home
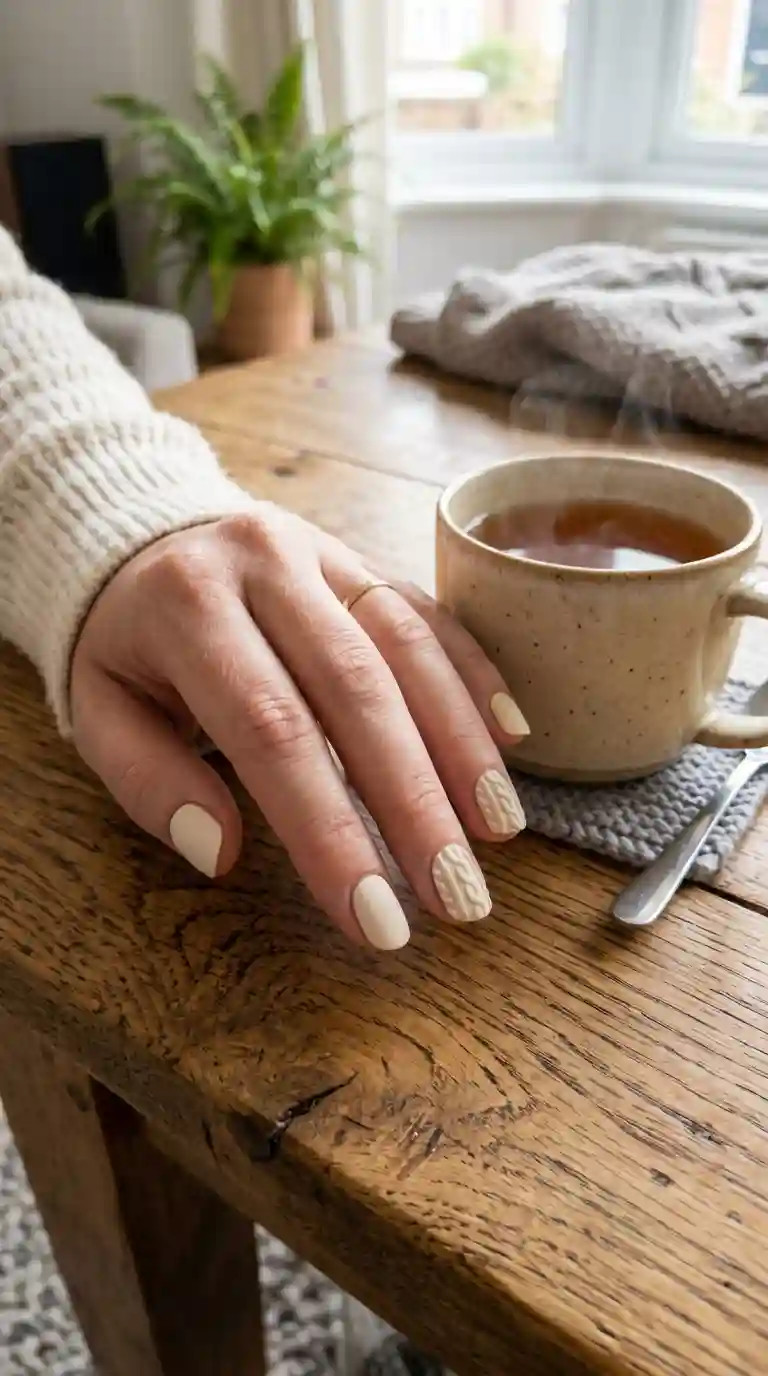
You do not need to be a professional nail technician to attempt sweater nail design at home, though it does require more patience than a standard manicure. Over the years I have picked up a few tips that make this process much more manageable for anyone trying it for the first time without professional training.
Start by prepping your nails properly, pushing back the cuticles, gently buffing the surface and wiping away any oils with rubbing alcohol. A clean, smooth base is especially important for this style, since any bumps or ridges on the natural nail will become far more noticeable once you start layering texture on top.
Apply your base color in two thin, even coats, allowing full drying time between each layer. Once the base is completely set, begin building your chosen texture slowly, working in small sections and allowing each layer to dry or cure before moving on to the next. Rushing this part of sweater nail design is the single most common reason home attempts end up looking messy rather than polished.
Step By Step Guide For Sweater Nail Design
- Start with clean, dry nails and gently push back the cuticles.
- Apply a thin base coat and allow it to dry completely.
- Paint two thin coats of your chosen neutral base color, letting each layer dry fully.
- Begin building your raised texture using a thin brush, working in small sections.
- Cure or dry each texture layer fully before adding the next one on top.
- Seal the finished design with a matte topcoat for the most realistic knitted appearance.
Taking your time through each of these steps genuinely makes the biggest difference in how professional your finished sweater nail design looks, even for a complete beginner attempting this for the first time.
Tools And Products I Use For Sweater Nail Design
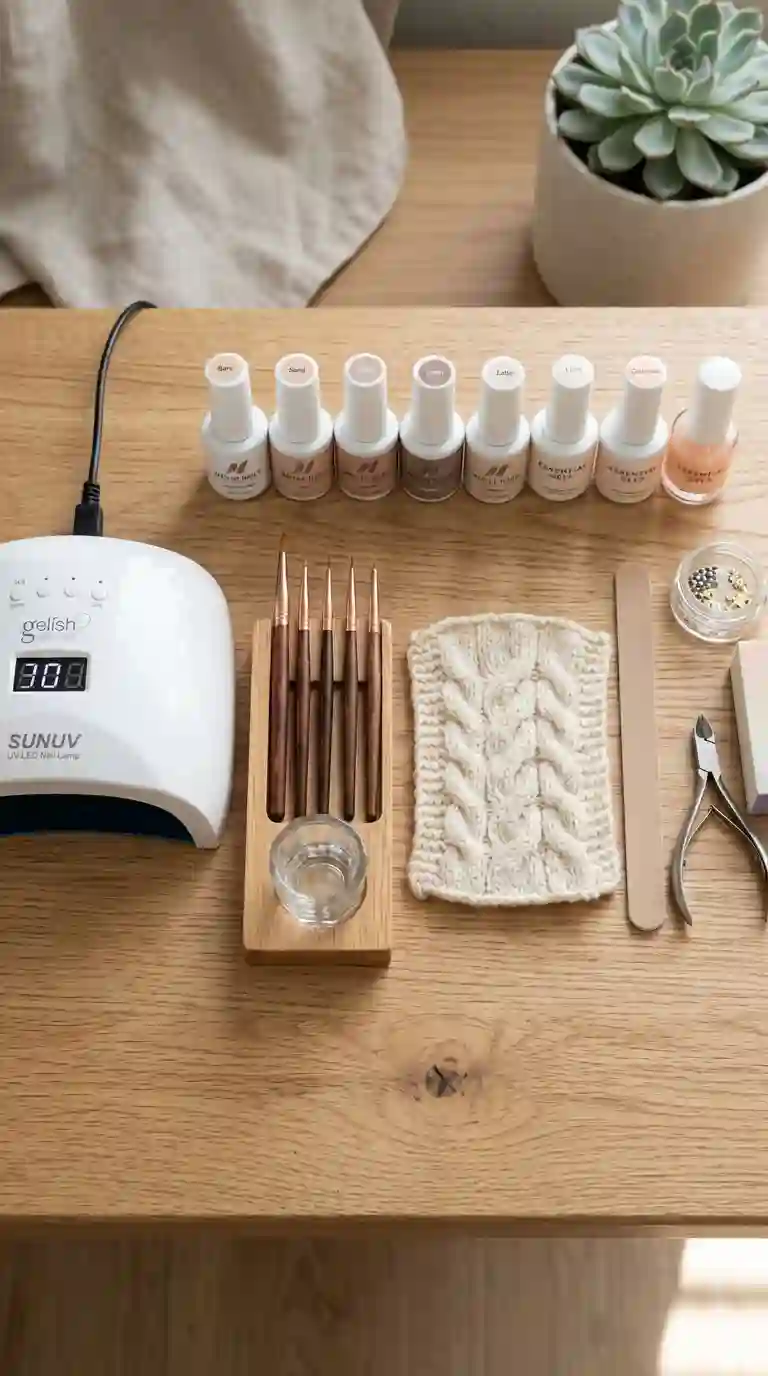
Over the years I have gathered a small collection of tools that make creating sweater nail design significantly easier, both in my studio and for clients trying to recreate the look at home. A thin, pointed detail brush is absolutely essential for building clean, controlled lines when creating the raised texture.
A small UV lamp is necessary if you are working with gel polish, since curing each texture layer properly is what allows the design to hold its raised, three dimensional shape. I also keep a piece of real knit fabric nearby as a visual reference, which genuinely helps when trying to replicate the natural crossing pattern of an actual cable knit sweater.
For clients who want a bit of extra warmth to their sweater nail design, a fine matte topcoat is always the final step in my process, since it ties the entire look together and gives that soft, fabric like finish that makes this style so recognizable.
How To Make Sweater Nail Design Last Longer
Textured nail art can sometimes feel more delicate than a standard flat manicure, so there are a few things I always recommend to help sweater nail design last as long as possible. Wearing gloves while washing dishes or doing household chores helps protect the raised texture from unnecessary friction and moisture damage.
Applying cuticle oil daily keeps the surrounding skin healthy and helps prevent the polish from lifting prematurely at the edges. Using a strong matte topcoat, reapplied every few days if needed, also helps protect the raised texture from smoothing out or wearing down over time.
Avoiding activities that put excess pressure directly on the textured area, like typing aggressively on a keyboard or repeatedly running your nails over rough surfaces, also helps preserve the crisp definition of your sweater nail design for as long as possible.
Also Read : Wild and Wonderful: The Complete Guide to Animal Print Nail Designs That Turn Heads Everywhere
Sweater Nail Design For Different Nail Shapes
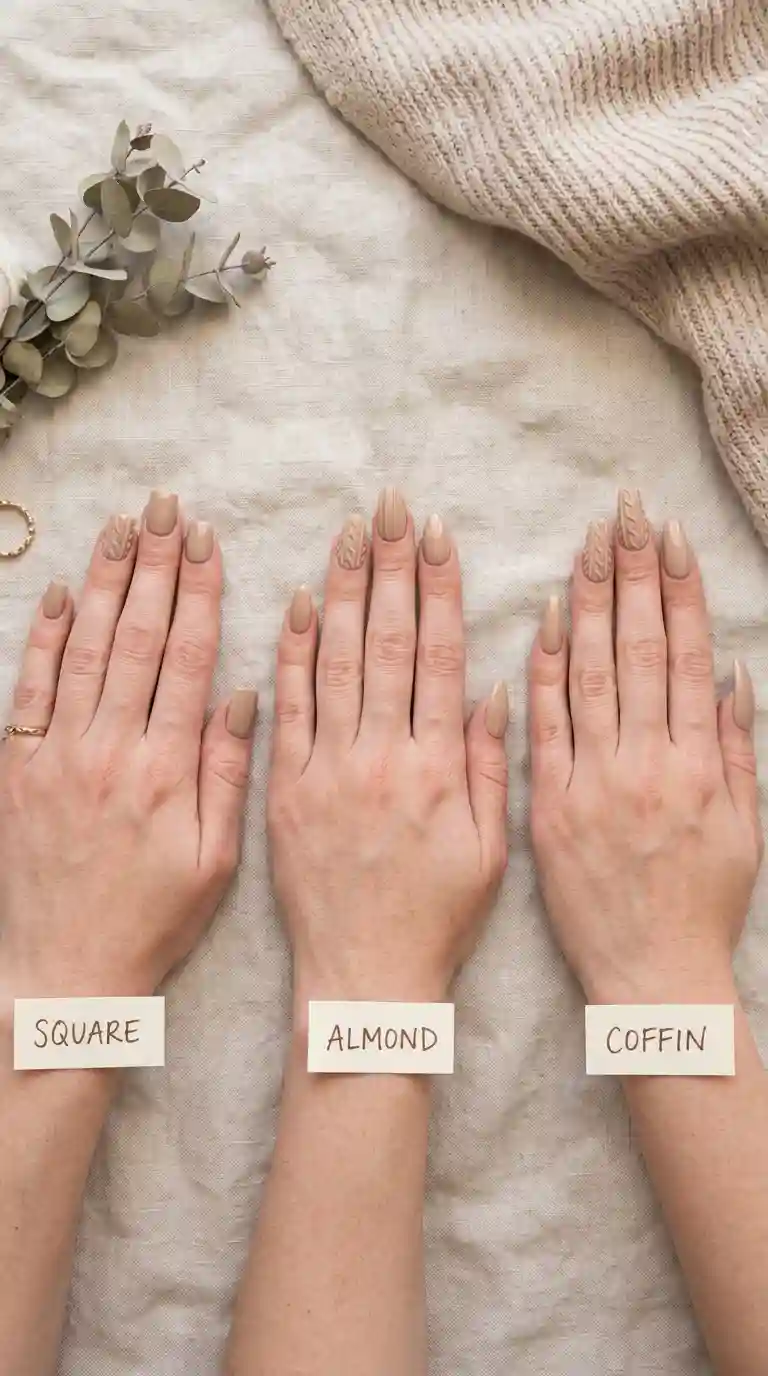
While almond and coffin shapes tend to showcase sweater nail design particularly well due to their length and surface area, this style genuinely works across nearly every nail shape. Square nails offer a wider, flatter canvas that can beautifully display a cable knit pattern, especially when the crossing lines are spaced slightly wider apart to fit the shape.
Round nails, often chosen for a softer, more natural look, work especially well with a simplified ribbed texture rather than a more intricate cable knit pattern, since the curved shape can make very detailed crossing lines a bit trickier to execute cleanly.
Regardless of shape, the most important factor for a successful sweater nail design remains the same. A smooth, well prepped base and patient, careful layering will always produce a better result than rushing through the process on any particular nail shape.
Mistakes To Avoid When Trying Sweater Nail Design
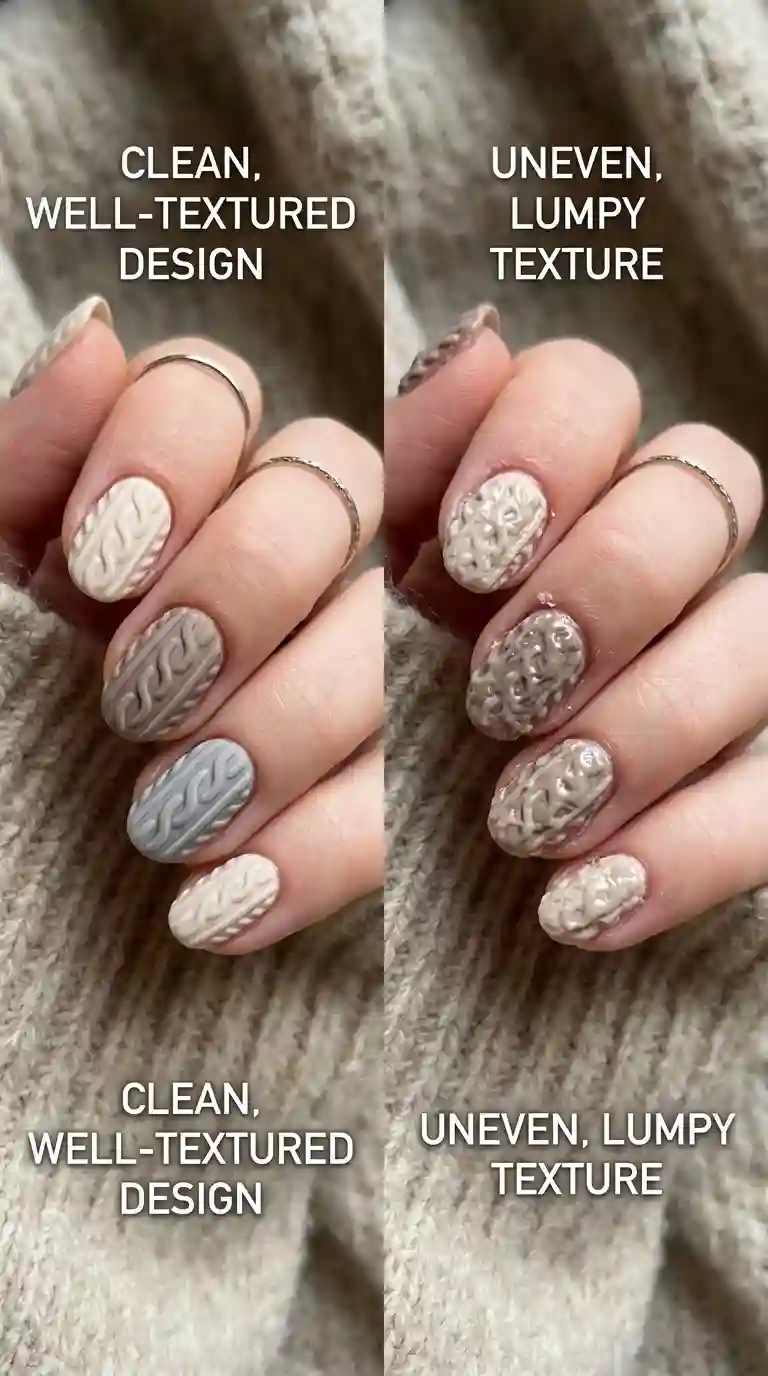
After creating sweater nail design for countless clients over the years, I have seen a handful of mistakes come up repeatedly, especially among those trying this technique for the first time. The most common issue is building up texture too quickly, without allowing each layer to properly dry or cure before adding the next one on top.
Another frequent mistake is choosing a base color with a glossy finish rather than matte. Even the most carefully executed raised texture can end up looking more plastic than fabric if it is sealed with a shiny topcoat instead of a proper matte finish, which really is essential for achieving that authentic knitted look.
Rushing the overall process is probably the biggest issue I see, whether that means skipping curing time between layers or trying to complete an entire cable knit pattern in one sitting without breaks. Sweater nail design genuinely rewards patience, and taking the extra time almost always shows in the final quality of the finished manicure.
Sweater Nail Design For Nail Art Beginners
If you are new to nail art, sweater nail design might initially feel intimidating given the level of detail involved in the more elaborate cable knit patterns, but there are plenty of beginner friendly entry points into this trend. Starting with a simple ribbed texture, using straight vertical lines rather than complex crossing patterns, is a great way to practice the raised texture technique without feeling overwhelmed.
Once you feel comfortable with basic raised lines, you can slowly progress toward simple crossing patterns and eventually a full cable knit design. Practicing on a nail wheel before attempting your actual nails is always a smart way to build confidence with the brush and get a feel for how the gel or paste behaves before committing to the real thing.
Pairing Sweater Nail Design With Your Outfit
I love encouraging clients to think about sweater nail design as an extension of their overall cold weather wardrobe rather than something separate from it. The warm, neutral palette pairs beautifully with the same colors typically found in autumn and winter clothing, including camel coats, cream turtlenecks and deep burgundy accessories.
For a monochromatic, effortlessly chic look, matching your sweater nail design closely to the actual sweater you are wearing that day creates a really cohesive, intentional style. Alternatively, choosing a contrasting neutral, like pairing a cream textured manicure with a deep forest green sweater, adds a bit of visual interest while still keeping the overall palette cozy and seasonal.
Read Also : 100+ Dazzling Dipped Nail Ideas That Will Transform Your Manicure Game Forever
Sweater Nail Design For The Holiday Season
While sweater nail design works beautifully throughout the entire fall and winter season, it becomes especially popular around the holidays, when chunky knitwear naturally becomes part of everyday wardrobes. Fair isle inspired patterns in particular tend to see a noticeable spike in requests during December, since the small geometric shapes naturally read as festive without needing any additional seasonal imagery layered on top.
For clients wanting something extra special for holiday gatherings, I sometimes add a few tiny rhinestones near the cuticle of an accent nail, or incorporate a deep red or forest green base color instead of the usual neutral tones. This small adjustment keeps the cozy, knitted texture intact while giving sweater nail design a slightly more festive, celebratory feel for the season.
Caring For Your Nails Underneath Sweater Nail Design
A beautiful manicure always starts with healthy nails underneath, and this remains true regardless of how detailed the design on top happens to be. I consistently recommend applying cuticle oil every night, especially throughout the colder months when skin and nails naturally tend to become drier.
Taking short breaks between more involved manicures, particularly if you wear gel or acrylic extensions regularly, gives your natural nails time to recover and stay strong. Healthy, well maintained nails underneath not only help sweater nail design look more polished, they also help the raised texture hold up better and last longer before requiring any touch ups.
Final Thoughts On Sweater Nail Design
After spending so many seasons perfecting sweater nail design in my studio, I can genuinely say this trend has earned its place as one of my favorite things to create every single year. There is something deeply satisfying about translating the comfort and warmth of a favorite sweater into something as small and detailed as a fingernail.
Whether you prefer a simple ribbed texture on a single accent nail, or a fully detailed cable knit pattern across an entire set, there is a version of sweater nail design that fits your personal style, patience level and lifestyle. My honest advice, both as someone who creates this look constantly and someone who genuinely loves the process, is to be patient with yourself if you are trying it for the first time. The texture takes practice, but the cozy, satisfying result is always worth the extra effort.
Frequently Asked Questions About Sweater Nail Design
What is sweater nail design?
Sweater nail design is a nail art technique that recreates the texture of knitted fabric, usually a cable knit or ribbed pattern, using raised gel or acrylic detailing on top of a base color.
What colors work best for sweater nail design?
Warm neutral tones like cream, camel, beige and taupe tend to look most realistic, though deep burgundy, forest green and dusty blue also work beautifully depending on personal preference.
Do I need special tools to create sweater nail design at home?
A thin detail brush and a UV lamp for curing gel are the main tools needed, though a texture specific gel or paste can make the process a bit easier.
How long does sweater nail design take to complete?
A detailed cable knit pattern across a full set can take significantly longer than a standard manicure, often an extra thirty minutes to an hour depending on complexity.
Can sweater nail design work on short nails?
Yes, short nails can absolutely handle this style. Scaling the pattern down and keeping the lines closer together helps the texture stay proportionate on a smaller nail bed.
Is matte or glossy better for sweater nail design?
Matte is almost always the better choice, since it diffuses light in a way that closely mimics real fabric, while glossy polish can make the texture appear too shiny and plastic like.
Can sweater nail design work on acrylic extensions?
Definitely. Acrylic extensions provide extra surface area, which actually makes it easier to create detailed cable knit patterns compared to shorter natural nails.
How do I make sweater nail design last longer?
Wearing gloves while cleaning, applying cuticle oil daily and using a strong matte topcoat all help protect the raised texture and extend the overall wear time.
Is sweater nail design only for winter?
While it is most popular during fall and winter, the neutral color palette and cozy texture can honestly be enjoyed at any time of year, depending on personal style.
Can beginners try sweater nail design at home?
Yes, starting with a simple ribbed texture using straight lines is a great, beginner friendly way to practice before attempting a more detailed cable knit pattern.
Pingback: Gorgeous Firework Nail Design Ideas for a Festive Manicure
Pingback: Nail Design With Lines: 45+ Chic & Creative Ideas
Pingback: Cute Candy Corn Nail Ideas for a Sweet Halloween Look