
Every October, my appointment book fills up faster than any other month of the year, and most of that rush comes down to one single request. Black halloween nails. Out of every seasonal trend I work with, this one gives me the most creative freedom, and honestly, it is the one I look forward to the most every single year.
There is something about black polish during Halloween that just feels right. It sets the mood instantly, works as a base for almost any spooky detail you can imagine, and somehow still manages to look elegant even when covered in cobwebs, bats or tiny painted spiders. Black halloween nails have this rare ability to be both eerie and beautiful at the same time, which is exactly why clients keep coming back to this idea year after year.
In this guide I am sharing everything I have learned from years of creating black halloween nails in my studio, from picking the right formula and finish, to detailed designs like spiderwebs, bats, pumpkins and glow in the dark accents. This is not a generic roundup pulled from random inspiration boards. This is what actually works in the chair, based on real client requests and plenty of trial and error along the way.
Also Read: Cute Purple Halloween Nails: 30 Bewitching Ideas Every Nail Lover Needs To Try This Spooky Season
Why Black Halloween Nails Are The Ultimate Spooky Season Staple
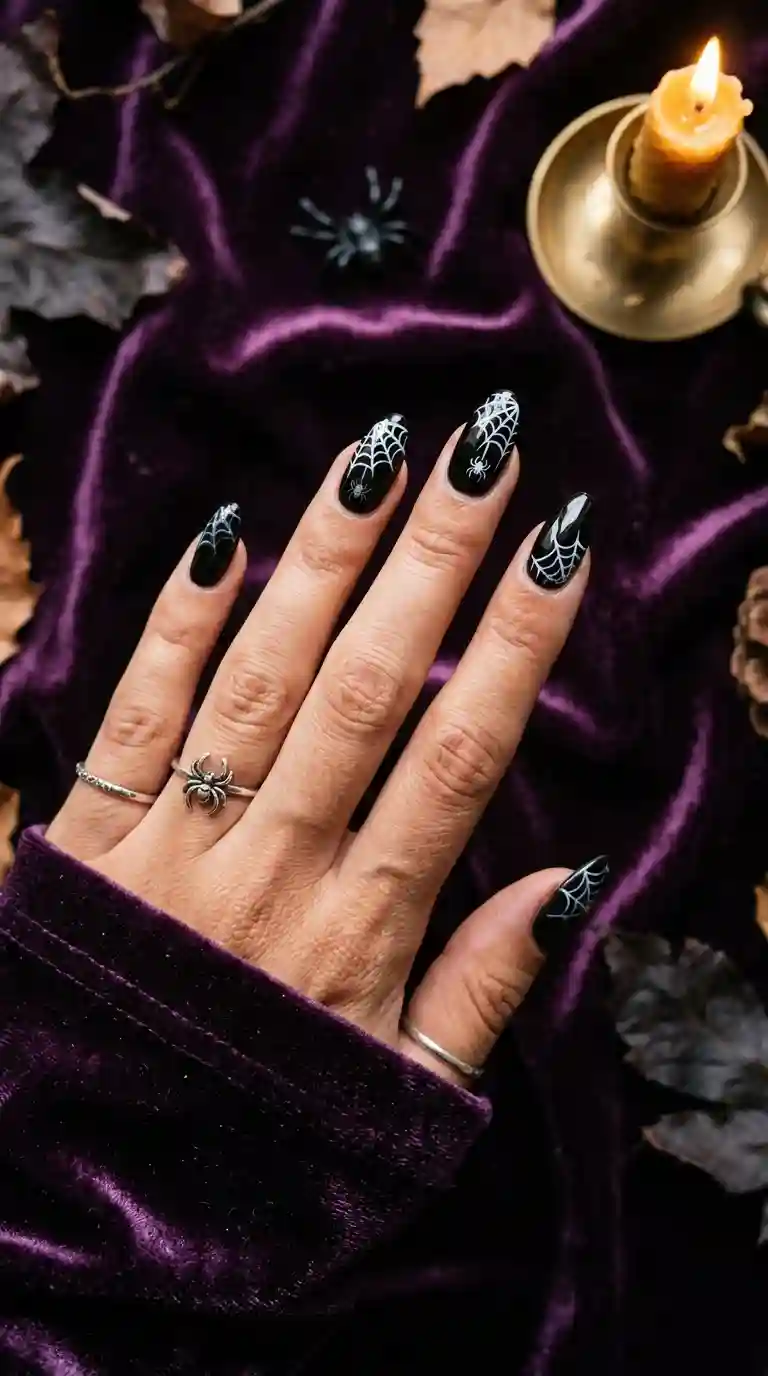
Black halloween nails have become the foundation of almost every spooky season manicure I create, and there is a good reason for that. Black is the most versatile base color imaginable for this holiday. It works for cute and playful designs just as easily as it works for eerie, horror inspired looks, which makes it the perfect starting point regardless of what kind of Halloween vibe a client is going for.
Another reason black halloween nails remain such a strong trend year after year comes down to how well they photograph. Whether it is candlelight, string lights or the flash on a phone camera, black polish creates a striking contrast against skin tone and against any detail painted on top, from silver spiderwebs to glow in the dark accents.
From a professional standpoint, black also happens to be one of the most forgiving base colors to work with. It hides small imperfections in the natural nail bed and creates a clean, dramatic backdrop for detailed nail art, which is part of why so many of my Halloween appointments start with a solid black base before anything else gets added.
My Personal Experience Creating Black Halloween Nails Every Season
Working in this industry for years, I have noticed that black halloween nails attract an incredibly wide range of clients, probably more than any other seasonal trend I offer. Some want something playful and cute, like tiny painted ghosts or pumpkins. Others want something genuinely spooky, almost horror movie inspired, with dripping blood effects or cracked, distressed textures.
What I love most about this particular request is how much personality clients bring into the appointment. Halloween seems to give people permission to get a little more daring with their nail choices compared to other times of the year, and black halloween nails become the perfect canvas for that creativity.
Over time, I have also noticed that black halloween nails tend to work beautifully across every age group. Younger clients often lean toward cute, cartoonish Halloween details, while older clients frequently request something more elegant and moody, like a simple matte black base with subtle silver detailing. Both approaches fall under the same general theme, and both look incredible depending on personal style.
Choosing The Right Black Polish For Black Halloween Nails
Not every black polish performs the same way, and this matters a lot when you are trying to create black halloween nails that actually last through weeks of costume parties, pumpkin carving and general Halloween chaos. Some formulas apply streaky, some dry with an odd grey tint, and some chip within a few days regardless of how carefully they were applied.
Whenever I prepare for the busy Halloween season, I always test my black polishes ahead of time on a nail wheel. I am looking for full, even coverage within two coats, a smooth application and solid wear time. Gel polish tends to be my preferred choice for black halloween nails specifically because it holds up much better against the cooler, drier weather that usually rolls in around this time of year.
Must Read: 40+ Cozy November Nail Ideas That Will Instantly Upgrade Your Autumn Look
Matte Black Versus Glossy Black For Halloween Nails
One of the most common questions I get asked is whether matte or glossy black looks better for black halloween nails. Both finishes work beautifully, but they create very different moods. Glossy black feels classic and polished, and it pairs wonderfully with metallic details like silver cobwebs or a bit of red for a dripping blood effect. Matte black feels darker and more mysterious, almost velvet like, which works especially well for horror inspired designs.
I personally love combining both finishes within a single set for black halloween nails. A full matte black manicure with one glossy accent nail featuring a hand painted spider or a small painted moon creates a subtle but effective contrast that elevates the entire look without adding extra color.
Black Halloween Nails With Classic Spiderweb Designs
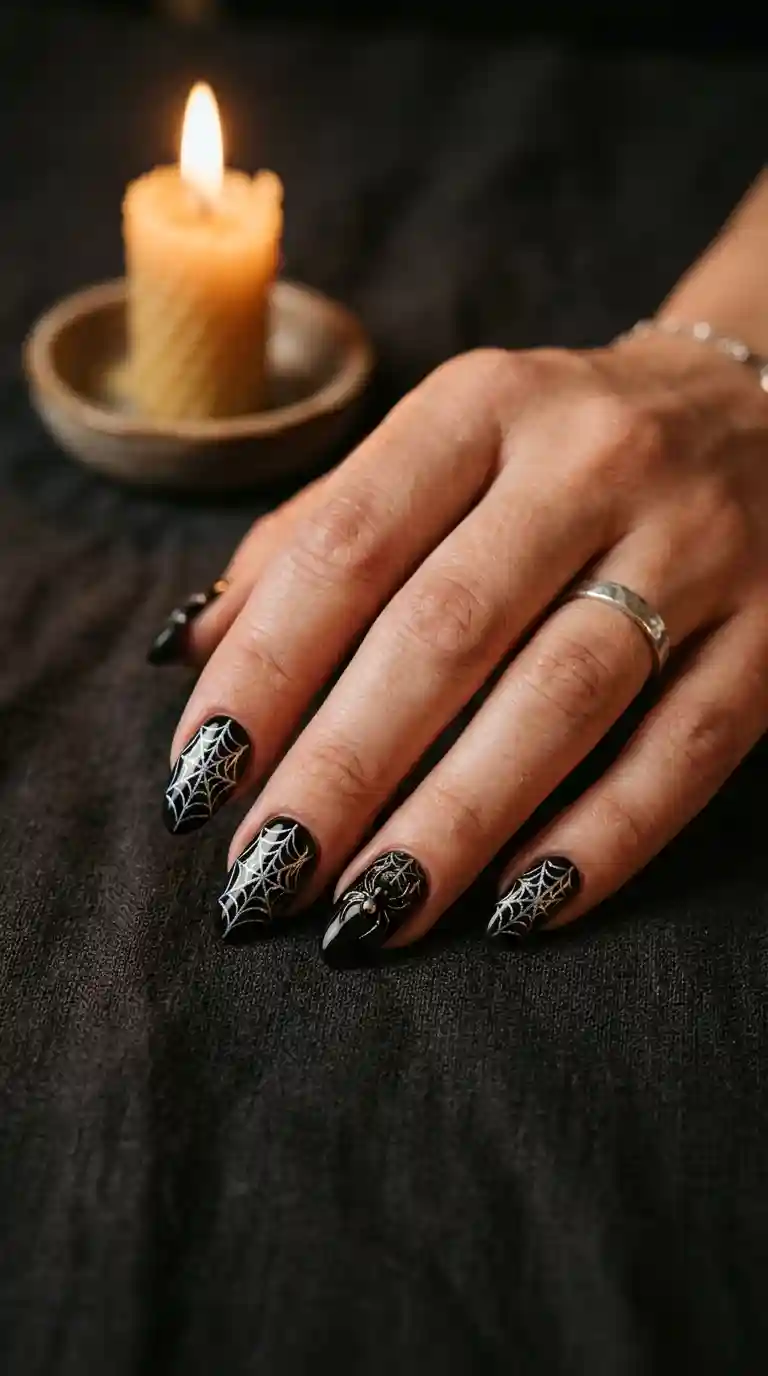
Spiderwebs are probably the single most requested detail I paint every Halloween season, and they work beautifully on top of black halloween nails because the contrast makes every delicate line stand out clearly.
I usually start with a thin brush and white or silver polish, painting a simple radiating pattern from a central point, then connecting the lines with soft curved threads to complete the web. For clients who want something more dramatic, I sometimes add a tiny black spider sitting at the center or along one edge of the web for extra detail.
Simple Spiderweb Black Halloween Nails For Beginners
If you are attempting black halloween nails at home for the first time, starting with a simple spiderweb is a great way to build confidence. Just four straight lines crossing through a central point, followed by a few connecting curves, already reads clearly as a web once painted against a black base. You really do not need to overcomplicate the design to get a striking result.
Practicing this pattern on paper or a nail wheel before committing to your actual nails helps a lot, especially when it comes to keeping the lines thin and even.
Black Halloween Nails With Blood Drip Effects
For clients who want something a little more dramatic, blood drip designs are always a popular choice within the world of black halloween nails. This effect uses deep red polish painted in thin, dripping lines over a solid black base, mimicking the look of blood trickling down the nail.
I usually paint this using a fine detail brush, starting each drip near the cuticle and tapering it down toward the tip in an irregular, organic shape, since perfectly straight lines tend to look less realistic. Adding a small red dot at the very tip of each drip enhances the illusion even further.
This particular take on black halloween nails tends to be a favorite among clients dressing up for horror themed costume parties or anyone who wants their manicure to make a bold, unmistakable statement.
Read Also: Disney Christmas Nails: The Most Magical Holiday Manicure Trend You Need To Try This Year
Black Halloween Nails Featuring Bats And Moons
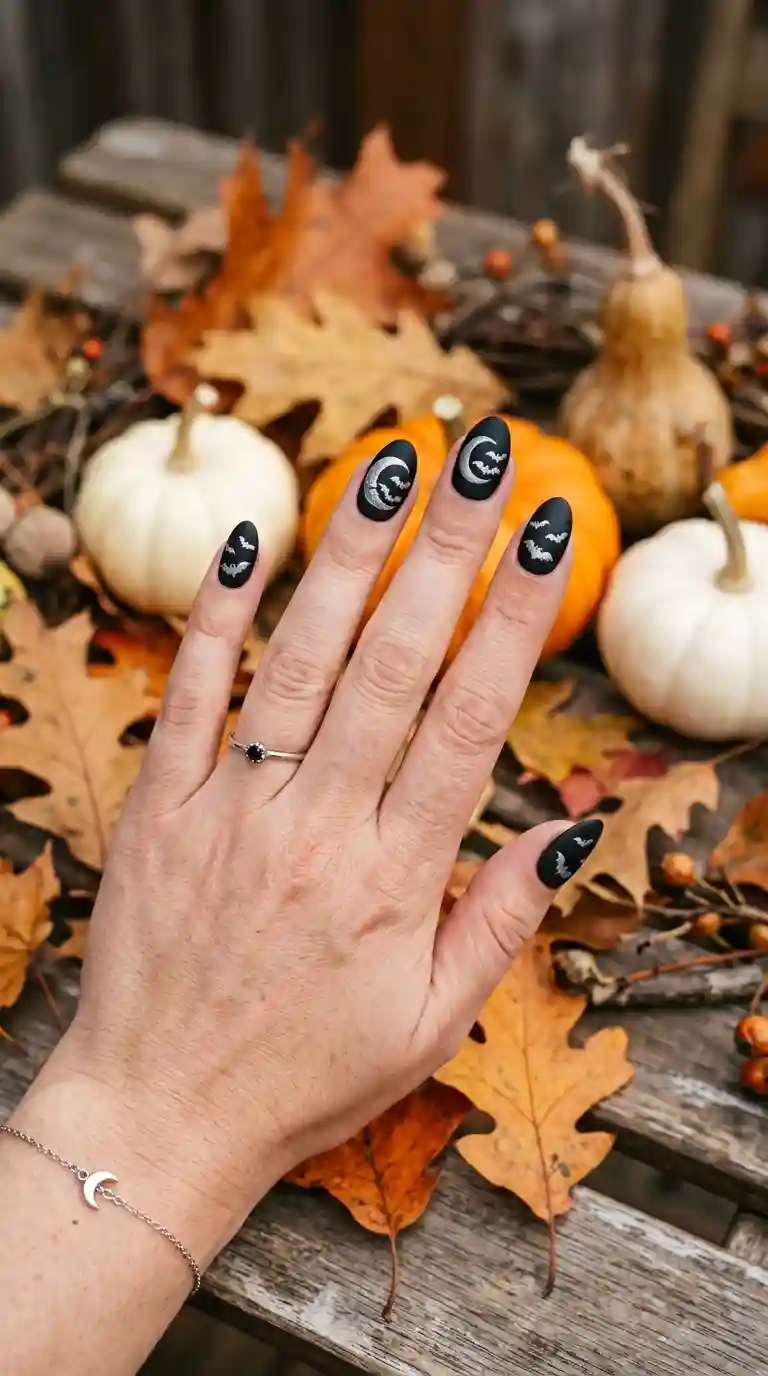
Bats and crescent moons are another combination I paint constantly during Halloween season. This design tends to feel spooky without being overly graphic, which makes it a great choice for clients who want something eerie but still wearable in a more everyday setting.
I usually start by painting a simple crescent moon shape in white, silver or grey, then add a few small bat silhouettes scattered nearby using solid black polish. The trick to making the bats look intentional rather than random is keeping the wing shapes slightly curved and uneven, almost like they are mid flight.
This version of black halloween nails works beautifully across almost every nail length and shape, and it tends to be one of the more versatile designs I offer during the season.
Black Halloween Nails With Pumpkin Accents
Pumpkins might seem like an obvious choice, but there is a reason this detail remains such a popular request every single year. Adding a small hand painted pumpkin to an otherwise solid black manicure instantly signals Halloween without needing anything overly elaborate.
I usually paint the pumpkin using a warm orange polish for the base, then add thin black lines to create the classic ridged pumpkin texture, finishing with a small brown stem at the top. Placing this detail on just one or two accent nails within a broader set of black halloween nails keeps the overall look balanced and prevents it from feeling too busy.
For clients who want a spookier twist, I sometimes paint a simple jack o lantern face onto the pumpkin using tiny triangular eyes and a jagged smile, which adds a fun, playful element to the design.
Black Halloween Nails With Glitter And Sparkle
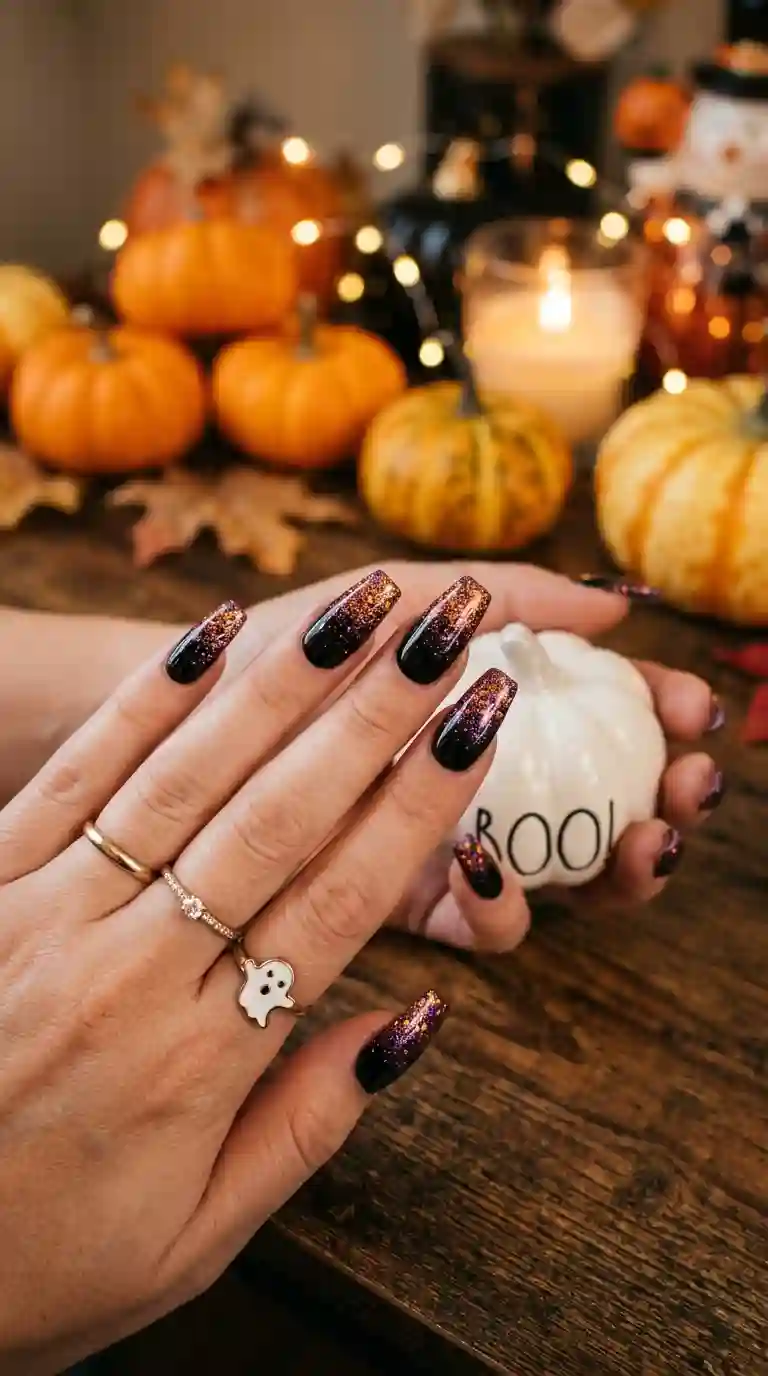
Glitter might not be the first thing people associate with black halloween nails, but a bit of sparkle actually works beautifully alongside a dark, moody base. Orange, purple and deep red glitters especially complement the traditional Halloween color palette without straying too far from the spooky theme.
I often apply glitter in a gradient near the tips of the nail, fading into solid black closer to the cuticle. This creates a shimmering effect that catches the light nicely under party lighting or even just everyday indoor lighting. For clients who want a bit more drama, a full glitter accent nail surrounded by four solid black nails adds just the right amount of sparkle without turning the whole set into something overly flashy.
Minimalist Black Halloween Nails For Subtle Style
Not everyone wants a heavily decorated Halloween manicure, and that is completely understandable. Some of my favorite black halloween nails are actually the simplest ones. A clean, glossy black manicure with just a tiny orange dot near the cuticle can look just as fitting for the season as a fully detailed design.
Minimalist black halloween nails are also a great option for clients who work in more conservative environments or who simply prefer a subtler approach to seasonal nail art. A single fine line of deep purple or burnt orange along the cuticle, sometimes called a reverse french tip, instantly gives black nails a Halloween feel without requiring much extra work.
I often recommend this style to clients who want their nails to transition smoothly from the Halloween season into regular daily wear afterward without feeling out of place.
Black Halloween Nails For Short Nails
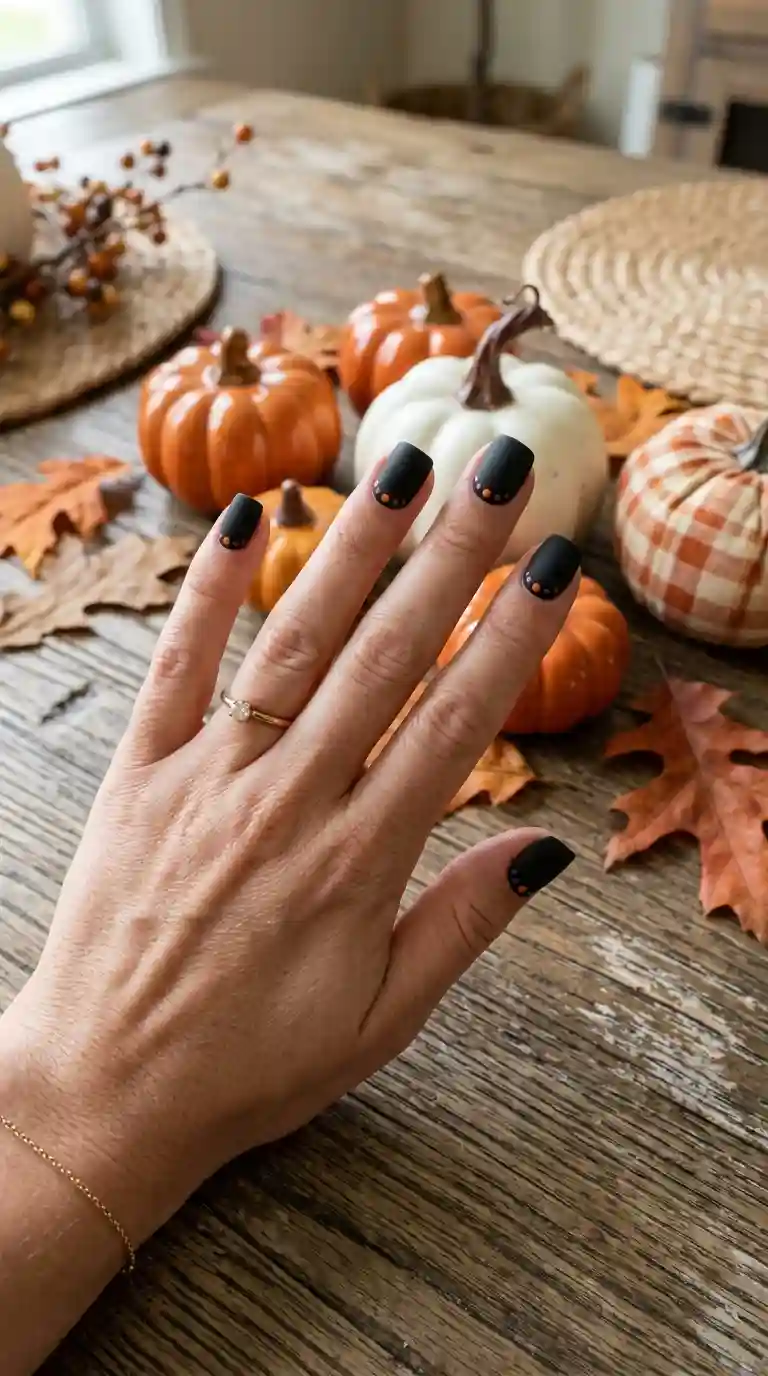
A lot of people assume detailed Halloween nail art only works on longer nails, but that is simply not the case. Short nails handle black halloween nails beautifully, you just need to scale the detail down a bit to fit the smaller canvas.
For shorter nails, I usually concentrate detail near the cuticle rather than spreading it across the entire nail bed. Small dots, thin lines, or a single tiny bat or spider near the base look clean and proportionate on shorter nails without appearing cluttered or overwhelming.
I have found that matte black tends to look especially striking on short nails, since the soft, velvety texture already adds visual interest on its own, meaning you do not always need extensive additional detailing to make the design feel complete.
Must Read: Cute Pumpkin Nail Designs: The Ultimate Fall Manicure Guide That Will Steal the Season
Black Halloween Nails For Long And Almond Shaped Nails
On longer almond or coffin shaped nails, there is so much more room to get creative with black halloween nails. I love using the extra surface area for bigger spiderweb designs, layered ombre effects, or even small painted scenes like a haunted house silhouette against a moonlit sky.
With longer nails, I also enjoy incorporating negative space into black halloween nails. Leaving a small unpainted section in the shape of a bat or a crescent moon creates visual interest and keeps the design from feeling too heavy, especially when the rest of the nail remains a deep, solid black.
French tips also translate beautifully onto longer nails when reimagined with a Halloween twist. Instead of a traditional white tip, painting the tip in deep orange, purple or even a subtle blood red against a black base gives an elegant, modern take that fits perfectly within the theme of black halloween nails.
Black French Tip Halloween Nails
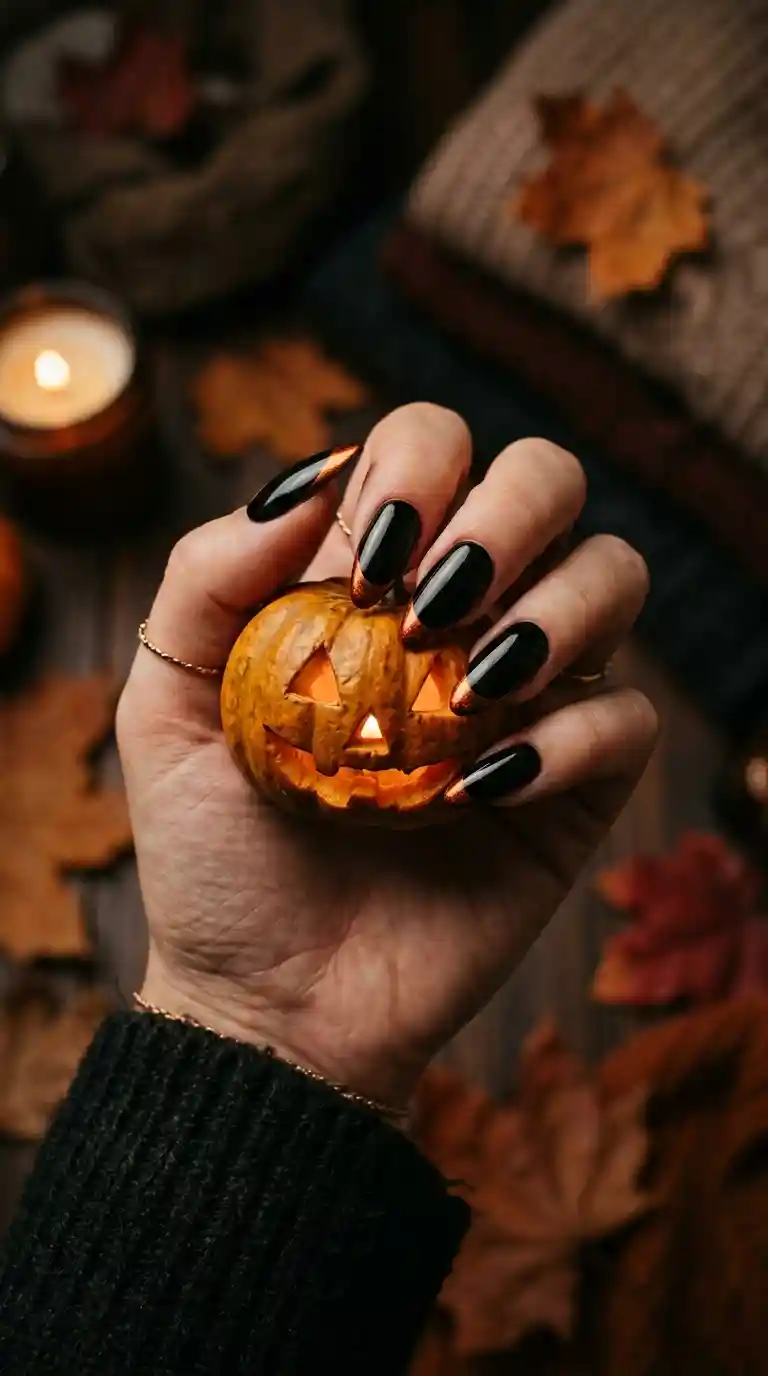
The classic french manicure gets a complete seasonal makeover when reworked for Halloween. Instead of the traditional pink base with a white tip, black halloween nails often use a solid black base with a metallic or colored tip in orange, purple or deep red.
I usually create this look using a thin striping brush to outline the tip shape first, then filling it in carefully to keep the line clean and precise. Adding a tiny black dot or small rhinestone right where the tip meets the black base gives the design a polished, finished appearance.
This particular variation of black halloween nails tends to be a favorite among clients who want something elegant enough to wear well beyond Halloween night itself, since the color combination still feels seasonally appropriate without being overly literal.
Black Halloween Nails With Silver Details
While orange and purple tend to dominate a lot of traditional Halloween nail art, silver deserves just as much attention when it comes to black halloween nails. Silver has a cool, almost metallic sheen that pairs beautifully with darker, more gothic inspired Halloween looks.
I often use silver for spiderweb designs, tiny star like accents, or a subtle ombre fade near the tips. Chrome silver powder applied over a black base also creates a striking mirror like effect that photographs incredibly well, which makes it a popular choice for clients attending Halloween parties who want their nails to stand out in photos.
Combining silver with just a touch of deep purple gives black halloween nails an even moodier, more gothic feel, especially when used for detailed cobweb or crack patterns near the cuticle.
Matte Black Halloween Nails For A Modern Gothic Twist
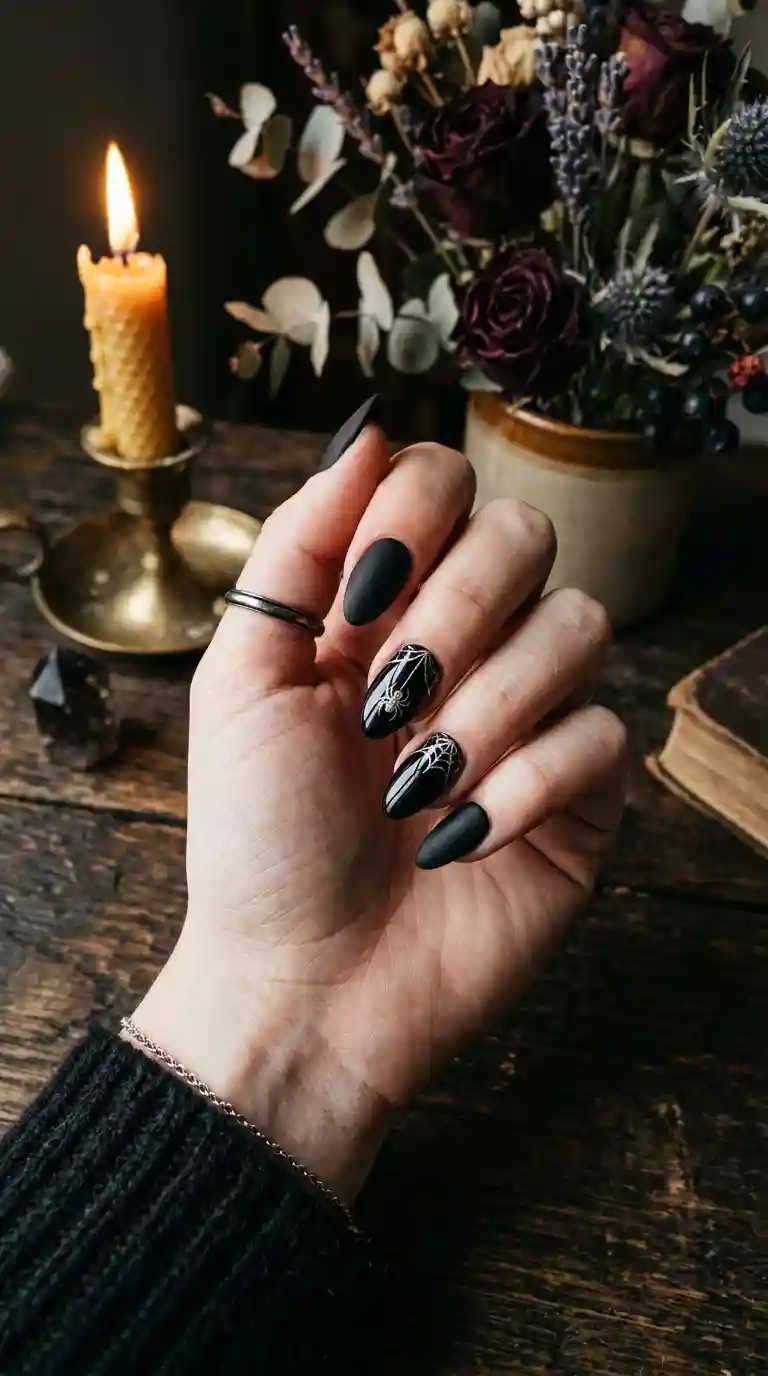
Matte finishes have become incredibly popular in recent years, and matte black halloween nails have this velvety, almost fabric like texture that instantly feels more mysterious compared to a traditional glossy manicure.
I usually recommend matte black to clients who want something edgier or more gothic inspired for the season. Pairing matte black with one glossy accent nail creates a nice textural contrast, especially when that glossy nail features a small detailed design like a spider, a tiny skull or a delicate web pattern.
Matte topcoats can sometimes feel more delicate than glossy formulas, so I always recommend sealing matte black halloween nails with a matte specific topcoat rather than skipping that step, which helps the design last much longer throughout the busy Halloween season.
Also Read : Black Christmas Nail Ideas That Will Make Your Holiday Manicure Absolutely Unforgettable
Black Halloween Nails Featuring Skulls And Skeletons
For clients who want something bolder, skull and skeleton details are a classic Halloween choice that pairs beautifully with a black base. I usually reserve this level of detail for one or two accent nails rather than the entire set, since the small scale makes intricate features challenging to replicate across every single finger.
Starting with a white or off white base shape for the skull, then adding small black details for the eyes, nose and teeth, creates a recognizable and striking result. Some clients prefer a more abstract, minimalist skull outline rather than a fully detailed illustration, which still fits comfortably within the broader theme of black halloween nails.
Skeleton hand designs have also become increasingly popular, with thin white bone shapes painted across a black base, often paired with a small spider or web nearby for extra detail.
Black Halloween Nails For Acrylic And Gel Extensions
A common question I get asked is whether black halloween nails work well on acrylic or gel extensions, and the answer is absolutely yes. In fact, extensions often provide even more room to work with when it comes to detailed Halloween nail art, since the nail shape and length can be fully customized before any polish is applied.
For acrylic sets, I usually recommend a coffin or almond shape for black halloween nails since the longer, tapered surface really shows off spiderweb designs, ombre effects and detailed illustrations beautifully. Gel extensions tend to have a slightly more natural, flexible feel, which some clients prefer for everyday wear throughout the busy Halloween season.
Whether you choose acrylic or gel, the application process for black halloween nails stays fairly consistent. The key is ensuring the base color is fully opaque and smooth before adding any detailed art on top, since small imperfections tend to show more clearly under a dark polish.
How To Apply Black Halloween Nails At Home
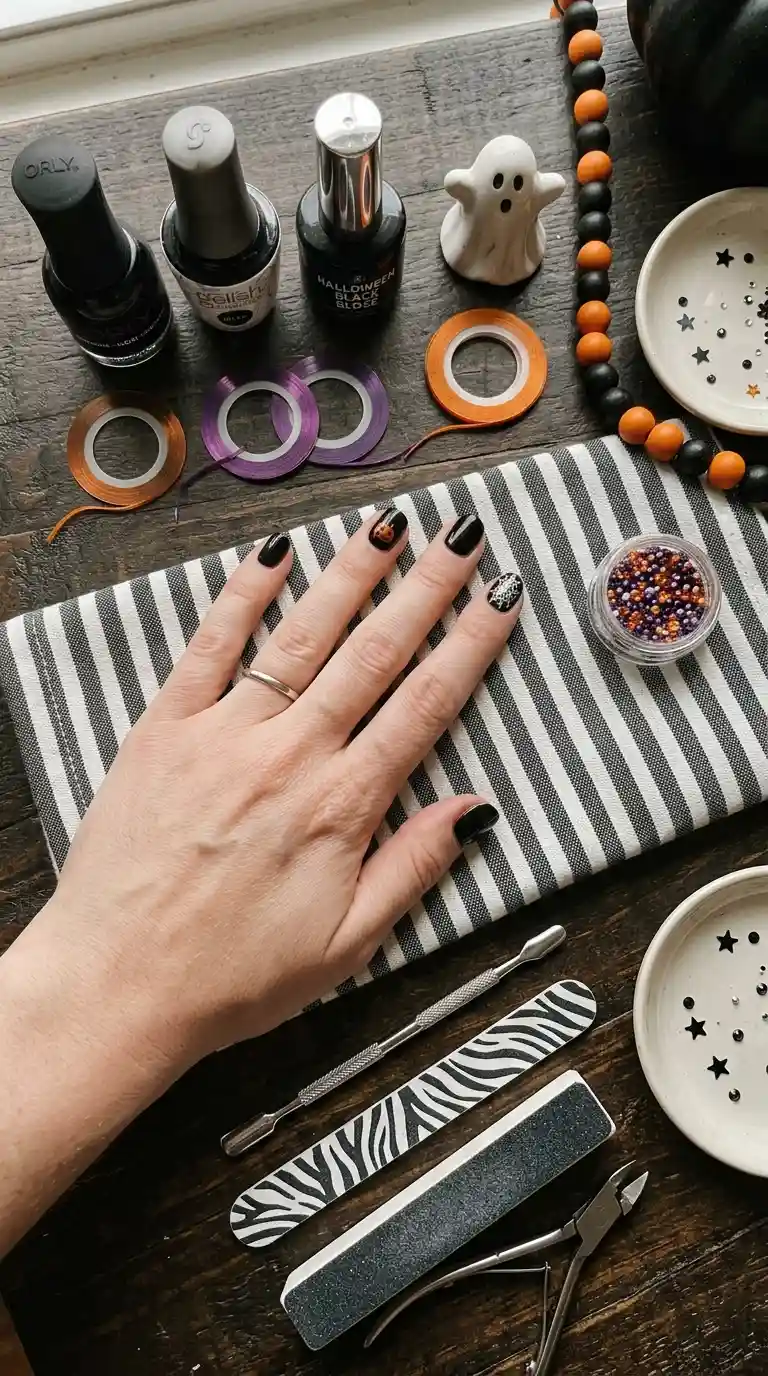
You do not need to be a professional to recreate black halloween nails at home, though a little patience definitely helps, especially for the more detailed designs. Over the years I have picked up a few tricks that make this process much easier for anyone trying it for the first time.
Start by prepping your nails properly. Push back your cuticles, gently buff the surface of the nail and wipe away any oils with a bit of rubbing alcohol. This step matters more than people realize, since black polish tends to highlight any bumps or ridges on the natural nail if the base is not smooth.
Apply a good quality base coat first, then two thin coats of black polish rather than one thick coat, which helps avoid streaking and speeds up drying time. Once the black base is fully dry, that is when the fun part begins with adding your chosen details, whether that is a spiderweb, a few painted bats or a dramatic blood drip effect.
Step By Step Guide For Black Halloween Nails
- Start with clean, dry nails and gently push back the cuticles.
- Apply a thin base coat and let it dry completely.
- Paint two thin coats of black polish, allowing each coat to dry before adding the next.
- Add your chosen detail, whether that is a spiderweb, a pumpkin, a bat or a blood drip effect.
- Seal everything with a glossy or matte topcoat depending on your preferred finish.
- Clean up any polish around the cuticles using a small brush dipped in acetone.
Following these steps in order really does make a difference in how long your black halloween nails end up lasting, especially during a season full of costume changes, parties and general Halloween chaos.
Read Also : Best Summer Pastel Nails: The Dreamy Manicure Trend Taking Over This Season
Tools And Products I Use For Black Halloween Nails
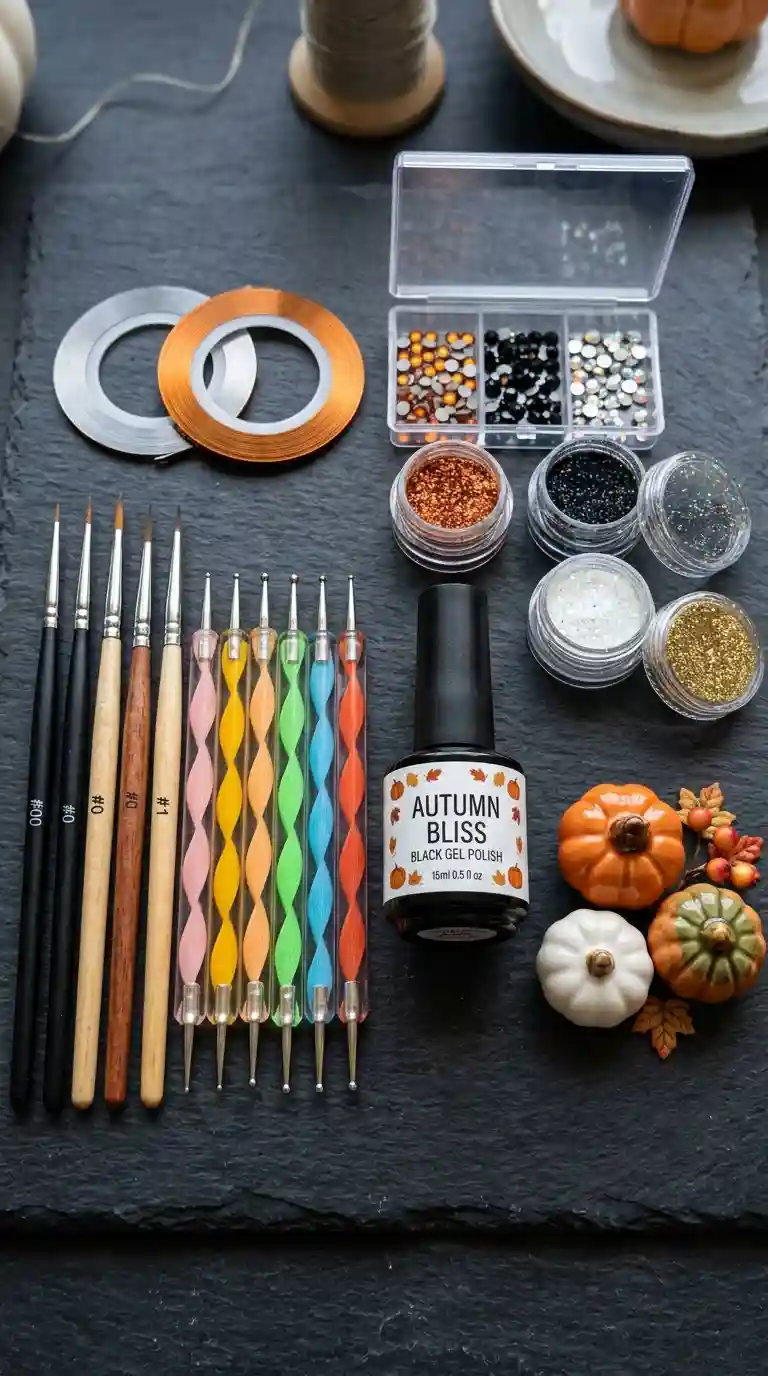
Over the years I have built up a small collection of tools that make creating black halloween nails so much easier, both in the studio and for clients recreating designs at home. A fine detail brush is probably the single most important tool for anything beyond a solid black manicure, since it allows for clean lines when painting spiderwebs, bats or tiny Halloween shapes.
Striping tape has also become one of my favorite shortcuts for achieving crisp, straight orange or silver lines on black halloween nails without needing perfectly steady hands. Simply place the tape where you want your line, paint over it, then peel it away before the polish fully dries for a clean, sharp result.
A good dotting tool makes adding small details like tiny dots, spider eyes or scattered accent details incredibly easy. I also always keep a small container of loose glitter and a few sizes of rhinestones on hand, since even a small addition of sparkle can completely transform simple black halloween nails into something that feels much more special for a party or event.
How To Make Black Halloween Nails Last Longer
The Halloween season is busy, and nobody wants their carefully painted manicure chipping halfway through the month. There are a few things I always tell clients to help black halloween nails last as long as possible.
First, always wear gloves when washing dishes or cleaning, since hot water and soap are two of the biggest culprits behind early chipping. Second, apply cuticle oil daily, which not only keeps your nails healthy but also helps prevent the polish from lifting at the edges.
Using a gel topcoat rather than a regular one also makes a noticeable difference in wear time for black halloween nails. Gel polish tends to resist chipping much better than traditional polish, especially during a season full of costume prep, pumpkin carving and general hand activity.
Finally, try to avoid using your nails as tools, whether that means opening packages, scratching off price tags or peeling stickers. Small habits like these add up quickly and can shorten the lifespan of even the most carefully applied black halloween nails.
Black Halloween Nails For Different Skin Tones
One of the best things about black halloween nails is how universally flattering they are. Black polish looks stunning against virtually every skin tone, though certain accent colors can be adjusted slightly to complement different undertones.
For lighter skin tones, I often recommend pairing black with cool toned silvers and soft purples, which creates a striking, gothic inspired contrast. For deeper skin tones, warm orange and deep red accents against black tend to look absolutely stunning, almost like the black polish makes those warmer tones glow even more.
Regardless of skin tone, black halloween nails tend to look polished and dramatic, which is part of why this trend has become such a favorite across so many different clients in my chair every single Halloween season.
Mistakes To Avoid When Trying Black Halloween Nails
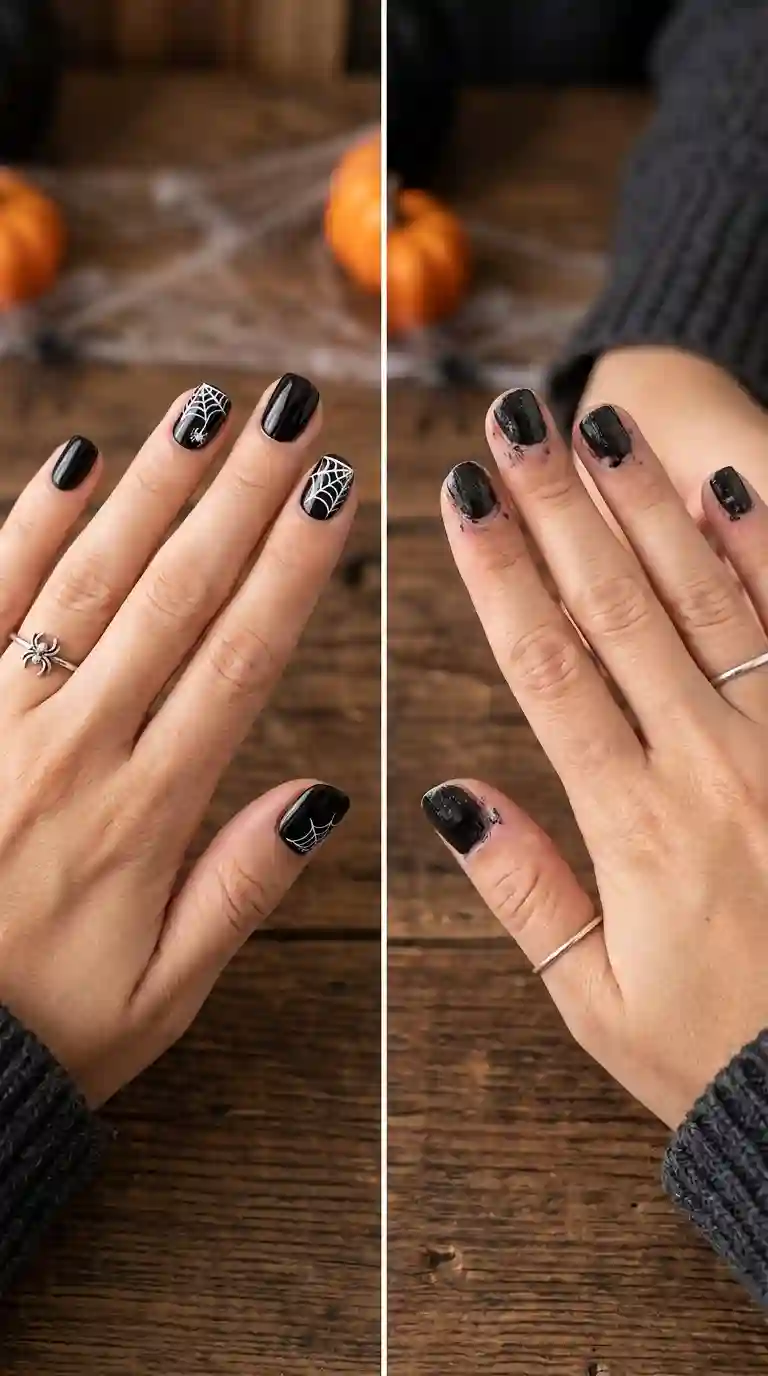
After years of doing black halloween nails professionally, I have seen almost every mistake possible, and honestly made a few myself early on. The most common issue is applying black polish too thick in an attempt to get full opacity in one coat, which almost always leads to bubbling, streaking and much longer drying times.
Another mistake I see often is skipping the base coat entirely. Black polish, especially darker gel formulas, can stain the natural nail if applied directly without a protective base layer underneath. This becomes especially noticeable once you remove the polish and find a yellowish tint left behind.
Rushing the drying process is another common issue. Black halloween nails often involve layering multiple elements, like a base color, detailed line work, glitter and a topcoat, and each layer needs proper time to dry before moving to the next step. Skipping this patience usually results in smudging or an uneven finish that shows up clearly against a dark background.
Black Halloween Nails For Nail Art Beginners
If you are completely new to nail art, black halloween nails might feel intimidating at first, but they are actually a great starting point. Black is a forgiving color that hides small mistakes better than lighter shades, which makes it a good confidence builder for anyone just starting out.
I usually recommend beginners start with a simple solid black manicure and a single accent nail, whether that means orange glitter, a few silver dots or a thin painted line. Once that feels comfortable, you can slowly build up to more detailed designs like spiderwebs or bat silhouettes.
Practicing your black halloween nails on a paper nail wheel before committing to your actual nails is a great way to build confidence with a brush and get comfortable with different techniques without the pressure of ruining a finished manicure.
Read Also : Western Fall Nails: The Boldest Autumn Nail Trend Taking Over This Season
Pairing Black Halloween Nails With Your Costume
One thing I love recommending to clients is thinking about their black halloween nails as part of their overall costume rather than something separate. Black nails are incredibly versatile and pair beautifully with almost any character or theme, which makes them easy to coordinate with whatever costume you have planned.
For a classic witch costume, black halloween nails with subtle purple or green accents create a rich, coordinated look without directly matching the outfit color, which I think tends to look more intentional than an exact match. For a vampire inspired costume, a deep red accent nail against a black base fits the theme beautifully.
Even for a simple, low effort costume, black halloween nails instantly elevate the overall look, making it feel a bit more put together without requiring much extra work.
Black Halloween Nails For Costume Parties
While black halloween nails obviously shine on Halloween night itself, they work beautifully for the entire string of costume parties that usually happen throughout the month. A glossy black base with heavy silver or purple glitter near the tips feels celebratory and festive without needing to change your entire manicure between events.
I often suggest clients keep their Halloween nails simple and elegant enough to carry through multiple parties, saving a few extra touches like additional rhinestones or a fresh glitter topcoat for the main event itself. This way, one appointment can comfortably cover the entire Halloween season from the first costume party through trick or treating night.
Caring For Your Nails Underneath Black Halloween Nails
Something I always emphasize with clients is that a beautiful manicure starts with healthy nails underneath. Black halloween nails can look absolutely stunning, but if the natural nail underneath is weak, dry or damaged, it affects both how the polish looks and how long it lasts.
I recommend applying cuticle oil every night throughout the Halloween season, regardless of how busy things get. This simple habit keeps the nail bed hydrated and prevents the polish from lifting prematurely. Taking a short break between manicures every few weeks also gives your natural nails time to breathe and recover, especially if you are wearing gel or acrylic extensions regularly.
Final Thoughts On Black Halloween Nails
After years of painting black halloween nails for clients every single spooky season, I can honestly say this trend has earned its place as a true seasonal classic rather than a passing fad. There is something about the richness of black polish combined with a touch of orange, silver or deep red that feels both eerie and elegant at the same time.
Whether you prefer something minimal like a single silver spiderweb, or something more elaborate like hand painted skulls and dripping blood details, there is a version of black halloween nails that fits your personal style and comfort level. My biggest advice, both as a nail artist and someone who genuinely loves this time of year, is to have fun with it. Halloween is meant to feel a little bold and a little daring, and your nails are a small, easy way to add a bit of that spooky spirit to your entire look.
Frequently Asked Questions About Black Halloween Nails
What colors go best with black halloween nails?
Orange, deep purple and silver are the most popular choices, since all three add a festive, spooky touch against a dark black base. Deep red also works beautifully for a bolder, more dramatic look.
How do I make black nail polish last longer during Halloween season?
Using a gel topcoat, applying cuticle oil daily and wearing gloves while cleaning are the best ways to extend the wear time of any seasonal manicure, including black designs.
How do I make black nail polish last longer during Halloween season?
Using a gel topcoat, applying cuticle oil daily and wearing gloves while cleaning are the best ways to extend the wear time of any seasonal manicure, including black designs.
Can black halloween nails work for short nails?
Yes, short nails handle black polish beautifully. Keeping details like spiderwebs or bat silhouettes concentrated near the cuticle helps the design stay proportionate on shorter nail beds.
Do black nails look good with orange glitter?
Yes, this is one of the most popular combinations for the Halloween season. The contrast between deep black and warm orange glitter creates a striking, festive effect that photographs beautifully.
How many coats of black polish do I need?
Most black polishes require two thin coats for full, even opacity. Applying one thick coat often leads to streaking and longer drying time.
Can I do black halloween nails on acrylic nails?
Definitely. Acrylic extensions actually provide extra surface area, making them a great canvas for more detailed Halloween designs like spiderwebs or skull illustrations.
What nail shape works best for black Halloween manicures?
Almond and coffin shapes tend to showcase detailed designs beautifully, though black polish looks elegant on virtually any nail shape, including square and round.
How do I remove glitter polish from black halloween nails?
Soaking cotton pads in acetone, placing them over each nail and wrapping with foil for about ten minutes usually breaks down glitter polish effectively without excessive scrubbing.
Is matte or glossy black better for Halloween nails?
Both look beautiful, and the choice really comes down to personal preference. Matte offers a modern, gothic inspired texture, while glossy feels more classic and vibrant.
Pingback: 50+ Spooky Summer Nails Ideas for a Fun Halloween Look