
There is something about a cherry nail design that just makes people smile the second they spot it. Maybe it is the glossy little fruit sitting on top of a soft nude base, or maybe it is the way a single hand painted cherry can turn an ordinary manicure into something people stop you on the street to compliment. As someone who has spent years behind the nail desk watching trends come and go, I can tell you that cherry nail design is not one of those fads that disappears after a season. It keeps coming back, and every time it returns, it looks a little fresher and a little more creative than before.
This article is going to walk you through everything you need to know about cherry nail design. We will talk about why it works so well, the different styles you can try, how to recreate them at home, the tools you actually need, the mistakes that ruin an otherwise pretty set, and answers to the questions people search for most often when they type “cherry nail design” into Google. Grab a cup of tea, get comfortable, and let us get into it.
Also Read : Baby Shower Nails Girl: 50 Adorable Ideas Every Mom To Be Will Love
Why Cherry Nail Design Has Become Such A Big Trend
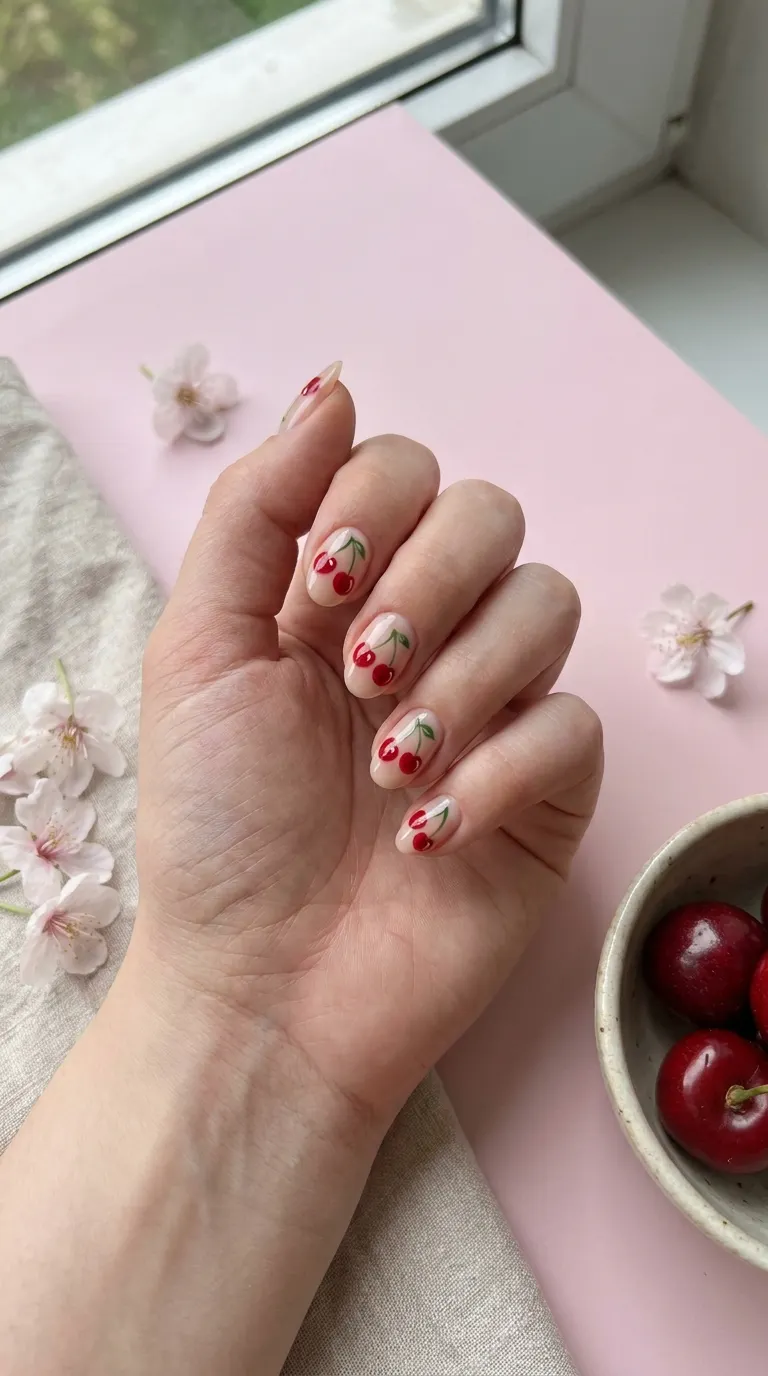
Every few months a new nail trend takes over social media, but cherry nail design has a staying power that most trends never manage to hold onto. Part of the reason is simple. Cherries are universally recognised as cute, sweet and a little playful, which makes them the perfect subject for nail art. They are small enough to paint neatly on a single accent nail, yet detailed enough to look impressive when done across a full set.
Another reason cherry nail design keeps trending is versatility. A cherry motif can be dressed up for a summer garden party or dressed down for a casual coffee run. It works on short nails, long nails, square tips, almond shapes, and coffin shapes. You can make it minimal with just a single cherry on one finger, or you can go bold with clusters of cherries, leaves, and stems climbing across every nail.
In my own salon chair, cherry nail design is one of those requests that clients bring in on a printed photo almost every week. Sometimes they want the exact cherry from Pinterest. Other times they ask me to design something original using the cherry theme but adding their own twist, like a name written in tiny script beside the fruit or a birthstone colour swapped in for the classic red.
Also Read: White Nail Design: The Timeless Manicure Trend Every Nail Lover Needs To Try
The Charm Behind A Simple Cherry Nail Design
There is a reason cherry nail design photographs so beautifully. The bright red of a cherry pops against almost any skin tone, and the glossy top coat used to finish the look mimics the natural sheen of real cherries. This combination of colour and shine is what makes a cherry nail design feel fresh rather than dated, even though fruit themed nail art has technically been around for decades.
I always tell my clients that cherry nail design is one of the few trends that looks equally good on a teenager heading to a summer festival and a working professional who wants a touch of personality without looking unprofessional. That range is rare in nail art, and it is exactly why cherry nail design has become a staple request in salons everywhere.
Understanding The Basics Before You Try A Cherry Nail Design
Before jumping into the different styles, it helps to understand what actually makes a cherry nail design look polished instead of messy. A cherry is a small, round shape with a subtle highlight, a slightly darker shadow underneath, and a thin green stem that often curves gently rather than sitting perfectly straight. Getting these small details right is what separates an amateur looking cherry nail design from one that looks like it belongs on a nail art account with a hundred thousand followers.
The Anatomy Of A Realistic Cherry
A well painted cherry has three basic elements. First there is the round fruit shape, which should never be a perfect circle because real cherries have a slight dip near the stem. Second is the highlight, a small white or light pink dot placed slightly off centre to mimic the way light bounces off the glossy skin of a cherry. Third is the stem, usually painted in a muted green or brown, curving naturally instead of standing straight up like a flagpole.
Once you understand these three elements, painting a cherry nail design becomes far less intimidating, even for beginners who have never attempted fruit nail art before.
Different Types Of Cherry Nail Design You Can Try
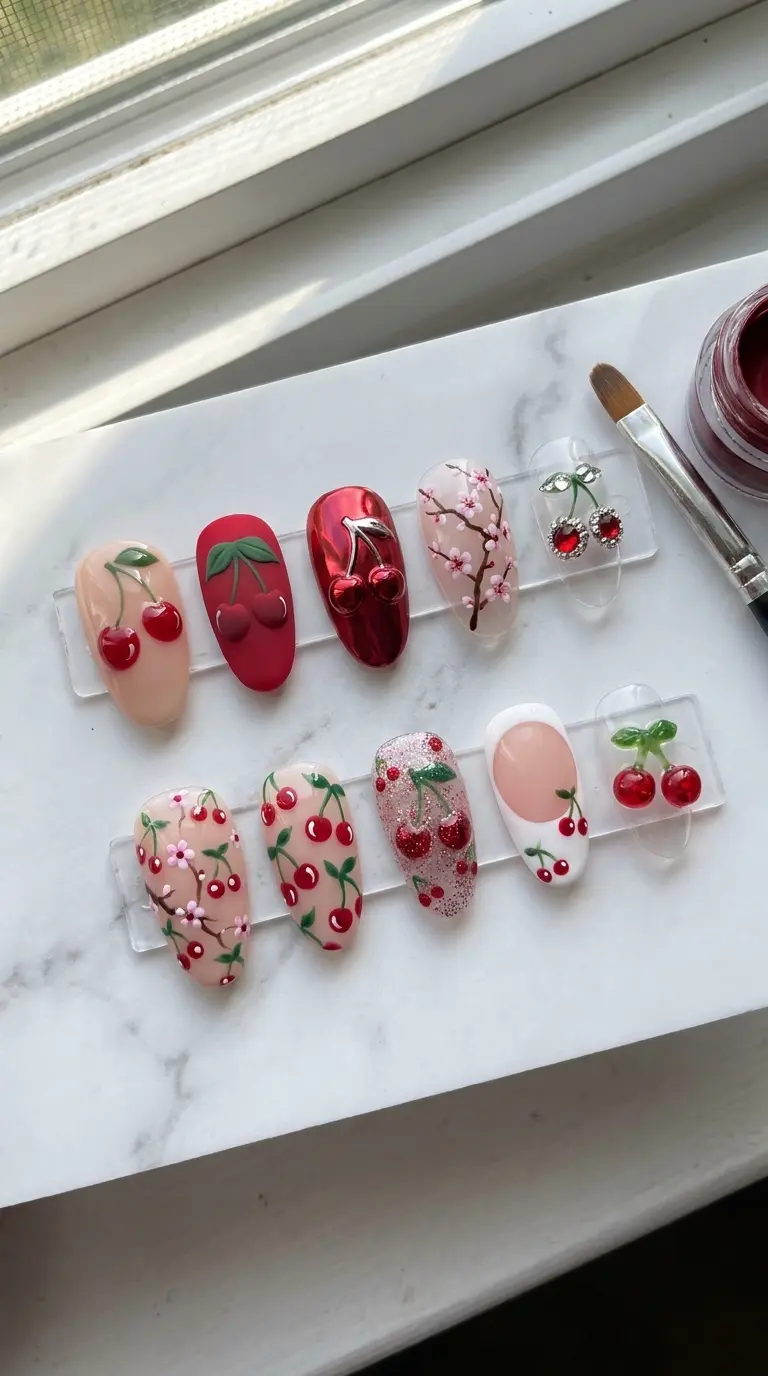
Cherry nail design is not just one look. It is actually a whole family of styles that share the same fruity theme but feel completely different depending on the colours, finishes, and placement you choose. Below are the most requested versions I see in the salon, along with tips on how to pull each one off.
Classic Red Cherry Nail Design
This is the version most people picture when they hear the phrase cherry nail design. A nude, soft pink, or milky white base with one or two glossy red cherries painted near the tip or cuticle area. It is simple, timeless, and works for almost any occasion.
The key to nailing the classic red cherry nail design is contrast. Your base colour should be light enough that the red cherries truly pop rather than blending into the background. I usually recommend a sheer milky base for this exact reason, since it gives the cherries room to shine.
Cherry Blossom Nail Design
Do not confuse this with the fruit itself. Cherry blossom nail design borrows the delicate pink flowers of the cherry tree rather than the cherries hanging from it. This style feels softer and more romantic, often paired with gold foil accents or a chrome finish to mimic the dreamy look of blossoms falling in spring.
Clients who want something feminine but do not love the boldness of red often gravitate toward cherry blossom nail design as a gentler alternative that still nods to the same seasonal theme.
3D Cherry Nail Design
For clients who want their nails to feel like a statement piece, 3D cherry nail design uses acrylic or gel to sculpt tiny raised cherries directly onto the nail. These little sculpted fruits catch the light beautifully and add a tactile, almost edible looking dimension that flat nail art simply cannot replicate.
This style takes longer to create and requires a steadier hand, but the payoff is worth it. A well done 3D cherry nail design tends to get the most compliments out of any variation I offer in my chair.
Minimalist Cherry Nail Design
Not everyone wants a full fruit basket painted across their fingertips, and that is where minimalist cherry nail design comes in. This style usually features one tiny cherry tucked near the cuticle of a single accent nail, while the rest of the set stays a plain, clean colour.
Minimalist cherry nail design is perfect for workplaces with strict dress codes, or for anyone who prefers a subtle hint of personality rather than a loud, all over pattern.
French Tip Cherry Nail Design
Combining two beloved trends, French tip cherry nail design swaps the traditional white tip for a red or pink cherry themed border, often finished with a tiny cherry motif at the base of the nail. This hybrid style has exploded in popularity because it takes something classic, the French manicure, and gives it a playful summer twist.
Chrome Cherry Nail Design
Chrome powder has taken over the nail industry in the past few years, and cherry nail design was quick to adopt the trend. A chrome cherry nail design uses metallic pigment over a red or burgundy base to create a mirror like, almost liquid metal appearance on the cherries themselves.
This version photographs incredibly well under natural light, which is part of why it has become such a favourite for anyone who posts their manicures online.
Must Read : 50 Stunning Red Nail Designs That Will Instantly Upgrade Your Manicure Game
Matte Cherry Nail Design
On the opposite end of the spectrum from chrome, matte cherry nail design trades shine for a soft, velvety finish. A matte top coat is applied over the painted cherries, giving the whole look a more muted, sophisticated feel. This version tends to appeal to clients who find high shine finishes a bit too flashy for their taste.
Glitter Cherry Nail Design
For clients heading to a party, wedding, or holiday celebration, glitter cherry nail design adds sparkle either directly onto the cherries or scattered across the base coat like tiny drops of morning dew. Fine glitter tends to look more elegant, while chunky glitter creates a bolder, more festive statement.
Cherry Nail Design For Short Nails
A common misconception is that fruit nail art only works on long nails. In reality, cherry nail design translates beautifully onto short, practical nail lengths too. The trick is scaling the cherries down and keeping the design to one or two accent nails rather than covering every finger, which can look cluttered on a smaller canvas.
Cherry Nail Design For Long Nails
On longer nails, whether acrylic, gel extensions, or naturally long tips, cherry nail design has more room to breathe. Artists can add extra detail like dewdrops on the cherries, layered leaves, or even tiny painted cherry pits for an ultra realistic effect.
How To Create A Cherry Nail Design At Home Step By Step
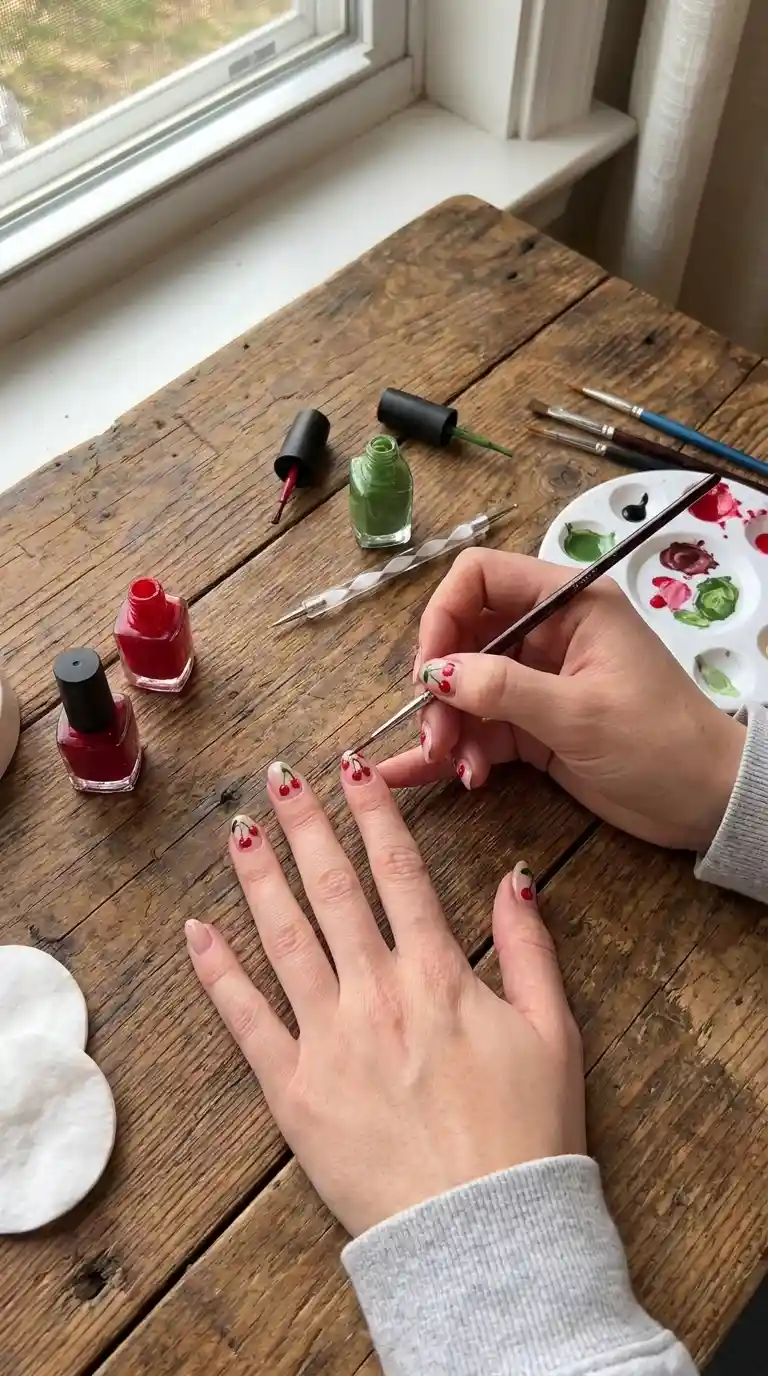
You do not need to be a professional to attempt cherry nail design at home. With a little patience and the right tools, most people can create a decent version on their first few tries. Here is the process I walk my at home clients through when they ask for tips.
Step One: Prep Your Nails Properly
Before any nail art, including cherry nail design, your nails need to be clean, shaped, and free of oil. Push back your cuticles gently, buff the surface lightly, and wipe each nail with an alcohol pad. Skipping this step is the number one reason home manicures chip within a day or two.
Step Two: Apply Your Base Colour
Choose the base shade for your cherry nail design. Nude, milky white, soft pink, and even black bases all work beautifully with red cherries. Apply two thin coats, letting each one dry fully before moving on.
Step Three: Paint The Cherry Shape
Using a small round brush or a dotting tool, paint two small circles close together to represent the pair of cherries. They do not need to be identical since real cherries never are. Slightly imperfect circles actually make the cherry nail design look more natural.
Step Four: Add The Shadow And Highlight
Once your red circles are dry, add a tiny bit of darker red or maroon near the bottom of each cherry to create depth. Then add a small white or light pink dot near the top of each cherry to mimic the natural shine.
Step Five: Paint The Stems
Dip a thin liner brush into green or brown polish and paint two curved lines connecting at the top of your cherries, just like a real cherry stem. This small detail is what really sells the entire cherry nail design.
Step Six: Seal With Top Coat
Finish your cherry nail design with a high shine or matte top coat depending on which finish you prefer. This step protects your art and gives it that professional, glossy look.
Tools And Products You Need For Cherry Nail Design
Creating a beautiful cherry nail design does not require a huge collection of supplies, but a few key tools make the process much easier, especially for beginners.
Brushes
A thin liner brush is essential for stems, while a small round brush or dotting tool works best for the cherry shapes themselves. Investing in a proper nail art brush set will make a noticeable difference in how clean your cherry nail design turns out.
Must Read : Purple and Black Nail Designs: 47 Bold Ideas That Will Instantly Upgrade Your Manicure Game
Polish Colours
At minimum you will need a red polish, a green polish for the stems, white for highlights, and your chosen base colour. Gel polish tends to give a more vibrant, long lasting cherry nail design compared to regular polish, though regular polish is perfectly fine for beginners practising at home.
Top Coat
A quality top coat, whether glossy or matte, seals in your design and prevents smudging. This is especially important for cherry nail design since the small painted details are more prone to chipping without proper sealing.
Dotting Tools
A simple dotting tool set helps create perfectly round cherry shapes and highlight dots without needing an incredibly steady hand. These are inexpensive and widely available, making them a smart first purchase for anyone new to nail art.
Colour Combinations That Pair Beautifully With Cherry Nail Design
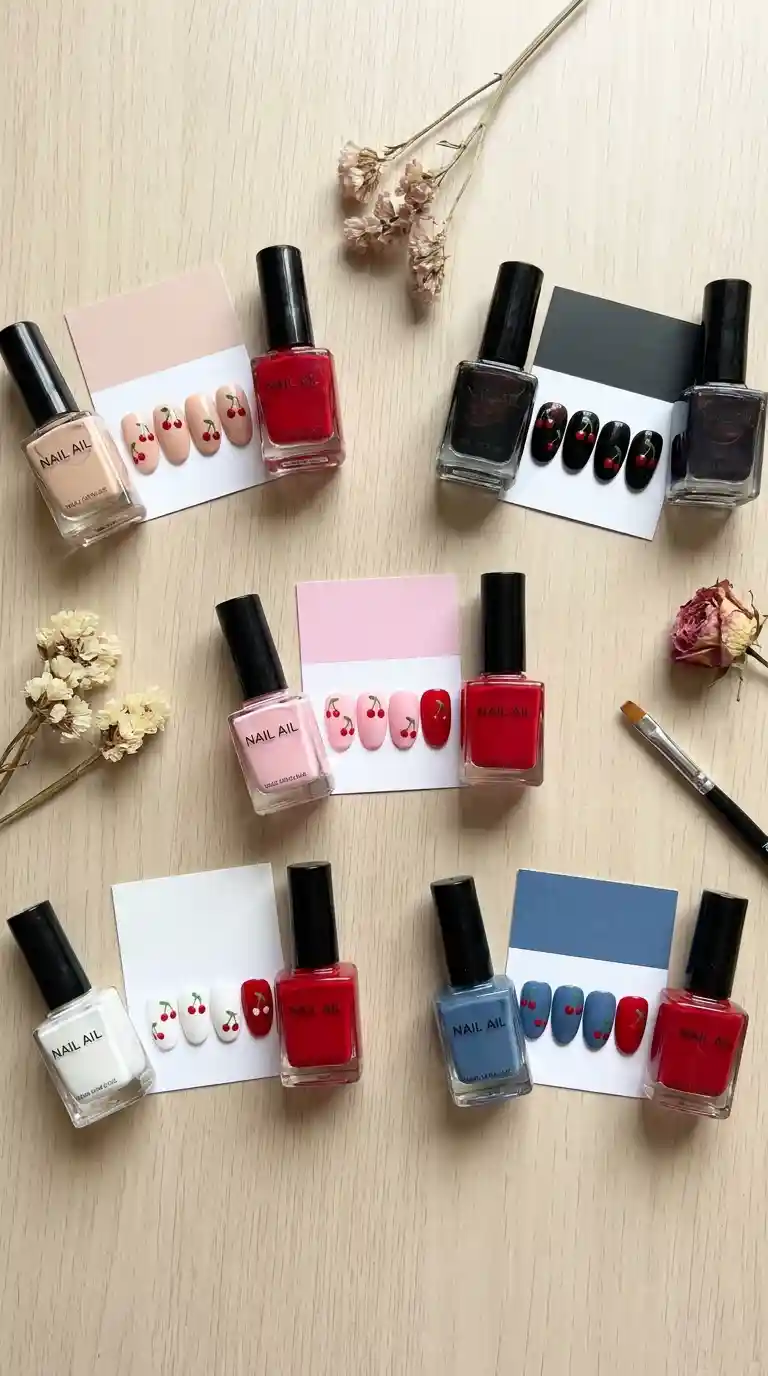
While red and green are the traditional colours associated with cherry nail design, there are countless base colour combinations that can completely change the feel of the look.
Nude Base Cherry Nail Design
The most popular choice, a nude base allows the red cherries to take centre stage without any competing colour. This combination feels clean, elegant, and works for nearly any occasion.
Black Base Cherry Nail Design
For a moodier, more dramatic take, a black base under bright red cherries creates striking contrast. This version is a favourite among clients who want their cherry nail design to feel edgy rather than sweet.
White Base Cherry Nail Design
A crisp white base gives cherry nail design a fresh, almost vintage diner inspired feel, especially when paired with a glossy finish.
Denim Blue Cherry Nail Design
This unexpected combination has grown popular in recent seasons, pairing a soft denim blue base with red cherries for a playful, Americana inspired look.
Pastel Pink Cherry Nail Design
A gentle pastel pink base softens the boldness of red cherries, creating a romantic, girlish version of cherry nail design that feels perfect for spring.
Cherry Nail Design For Every Season
One of the reasons I recommend cherry nail design to clients year round is how easily it adapts to different seasons and occasions.
Cherry Nail Design For Summer
Summer is when cherry nail design truly shines, quite literally, thanks to bright polish shades and glossy finishes that mimic sun kissed fruit. Pair your cherries with tropical accents like tiny daisies or a sheer coral base for a fun summer set.
Cherry Nail Design For Spring
In spring, cherry blossom elements often blend with the fruit itself, creating a design that celebrates both the flowering trees and the cherries that follow later in the season.
Cherry Nail Design For Winter
Surprisingly, cherry nail design also works beautifully in colder months. Pair deep burgundy cherries with a matte black or forest green base for a festive, holiday appropriate twist.
Cherry Nail Design For Valentine’s Day
Since cherries share the same red romantic colour palette as hearts and roses, cherry nail design has become a popular alternative to typical Valentine’s Day nail art, offering a sweeter, less predictable option.
How To Make Your Cherry Nail Design Last Longer
A gorgeous cherry nail design loses its charm quickly if it chips within a day or two. Over the years I have picked up a few tricks that genuinely extend the life of hand painted nail art.
Always Seal With A Proper Top Coat
Skipping top coat is the fastest way to ruin a cherry nail design. Apply a thick, even layer over the entire nail, making sure to cap the free edge to prevent lifting.
Avoid Hot Water Immediately After Application
Give your cherry nail design at least an hour to fully cure before washing dishes or taking a hot shower. Heat and moisture are two of the biggest enemies of freshly painted nail art.
Wear Gloves For Household Chores
This simple habit protects your cherry nail design from harsh cleaning chemicals and prevents unnecessary chipping around the edges.
Moisturise Your Cuticles Daily
Healthy, hydrated cuticles help your entire manicure, including any cherry nail design, look neater and last longer between fills or touch ups.
Common Mistakes People Make With Cherry Nail Design
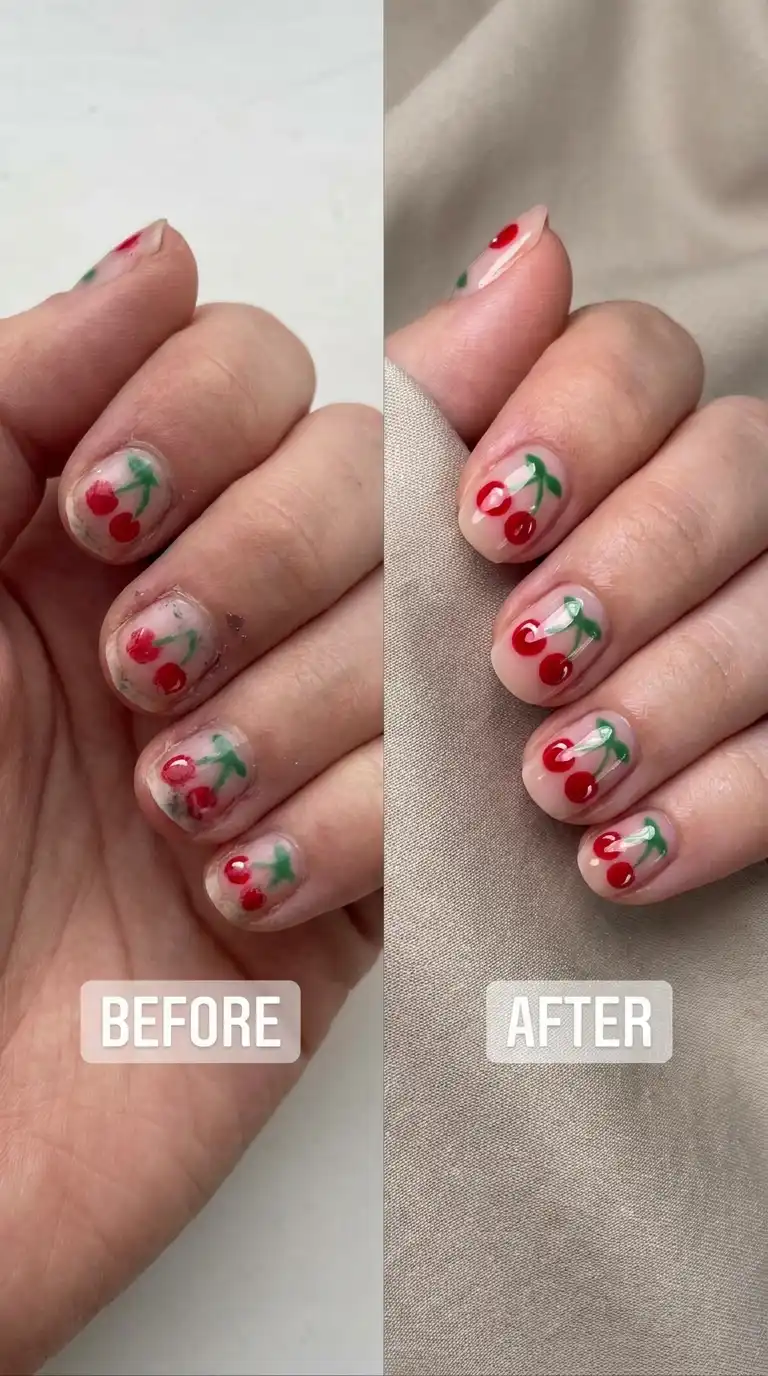
Even though cherry nail design looks simple on the surface, there are a few common mistakes that can make the final result look sloppy rather than polished.
Making The Cherries Too Perfectly Round
Real cherries are never perfectly symmetrical, so painting a flawless circle actually makes your cherry nail design look more artificial rather than realistic. Embrace small imperfections.
Skipping The Highlight
Without that tiny white or pink highlight dot, cherries can look flat and two dimensional. This one small detail adds so much depth to a cherry nail design.
Using Too Thick A Polish Layer
Thick layers take longer to dry and are more prone to smudging, which ruins the crisp lines needed for a clean cherry nail design. Thin, layered coats always produce better results.
Ignoring Nail Shape
A cherry nail design that works beautifully on an almond shaped nail might look cramped on a square tip. Always consider your natural nail shape before choosing your design placement.
Rushing The Drying Time
Patience really is everything in nail art. Moving too quickly between steps is one of the most common reasons a cherry nail design ends up smudged before it even gets to the top coat stage.
Cherry Nail Design Ideas Based On Nail Shape
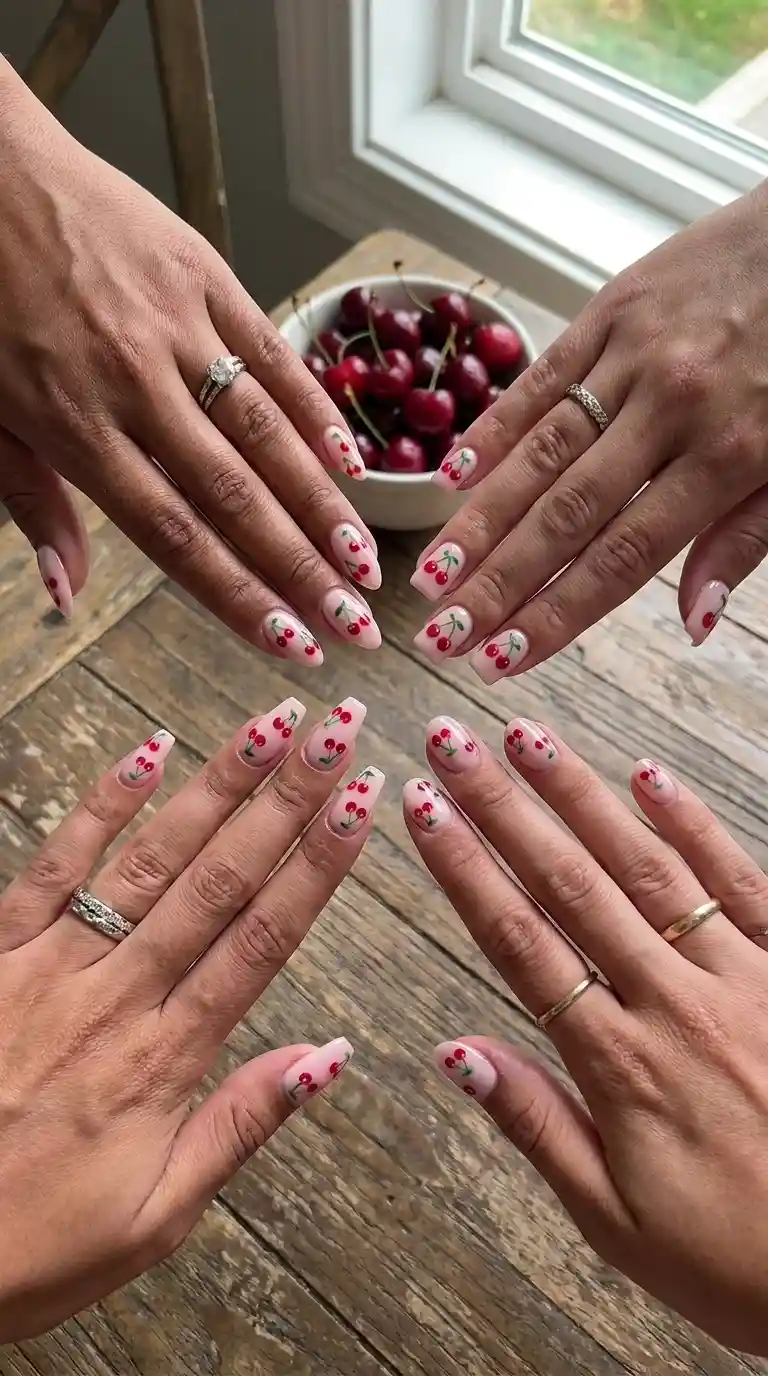
Your natural or extension nail shape can influence how you approach cherry nail design, so here are a few shape specific tips.
Almond Shaped Cherry Nail Design
The tapered tip of an almond shape gives cherries a beautiful, elongated canvas, making it ideal for a single large cherry near the base with a trailing stem toward the tip.
Square Shaped Cherry Nail Design
Square nails offer a wider, flatter surface, perfect for placing two or three cherries side by side in a cluster design.
Coffin Shaped Cherry Nail Design
The long, flat top of coffin nails works wonderfully for 3D cherry nail design, giving sculpted cherries plenty of room without looking cramped.
Round Shaped Cherry Nail Design
Round nails suit a simple, centred cherry design, keeping the whole look neat and proportionate to the smaller nail bed.
Also Read : Hot Pink Nail Designs: 47 Bold, Beautiful Ideas Every Nail Lover Needs To Try
Cherry Nail Design For Different Occasions
Beyond seasons, cherry nail design also adapts wonderfully to specific events and settings.
Wedding Guest Cherry Nail Design
A subtle, single accent nail cherry design paired with a soft nude or white base works beautifully for wedding guests who want a hint of personality without stealing attention from the bride.
Cherry Nail Design For Work
For office appropriate looks, keep your cherry nail design minimal, perhaps just one small cherry on the ring finger with a neutral base across the rest of the set.
Cherry Nail Design For A Night Out
Feel free to go bold for evenings out. Chrome or glitter cherry nail design catches the light beautifully under club or restaurant lighting.
Cherry Nail Design For Festivals
Bright, playful, full coverage cherry nail design fits right into the fun, carefree atmosphere of summer music festivals.
Cherry Nail Design On Acrylics Versus Gel
Clients often ask whether cherry nail design looks better on acrylic extensions or gel polish. Honestly, both work beautifully, but there are a few differences worth mentioning.
Acrylic nails offer a sturdier surface for 3D cherry nail design, since sculpted embellishments adhere more securely to the harder acrylic base. Gel polish, on the other hand, tends to produce a glossier, more vibrant finish for flat, hand painted cherry nail design, and it is generally gentler on the natural nail underneath.
Also Read : 87 Gorgeous Orange Nail Ideas That Will Make Your Hands Impossible To Ignore
How Professionals Achieve Salon Quality Cherry Nail Design
As someone who paints cherry nail design multiple times a week in the salon, I can tell you that professional results come down to three things: quality tools, thin controlled layers, and patience between steps. Many clients try to rush the process at home, applying the next layer before the previous one has properly dried, which causes smudging and uneven lines.
Another professional trick is using a very small amount of polish on the brush at a time. Overloading your brush is one of the fastest ways to lose control over delicate details like cherry stems and highlight dots.
Caring For Your Nails Between Cherry Nail Design Appointments
Maintaining healthy nails between appointments ensures your next cherry nail design always looks its best. Regular cuticle oil application, gentle filing rather than aggressive shaping, and avoiding using your nails as tools all contribute to a stronger, healthier canvas for future nail art.
Frequently Asked Questions
What Is A Cherry Nail Design?
A cherry nail design is a style of nail art that features painted or sculpted cherries, usually red with green stems, placed on a base colour of your choice. It can range from a single minimalist cherry to a full set covered in fruit inspired detail.
How Do You Paint Cherries On Your Nails?
Start with a clean, dry nail and your chosen base colour. Paint two small circles close together for the cherries, add a darker shadow near the bottom of each, a light highlight dot near the top, and finish with two curved green stems connecting at the top.
What Colours Go Well With Cherry Nail Design?
Nude, white, black, pastel pink, and denim blue are among the most popular base colours for cherry nail design, each creating a different mood from soft and romantic to bold and edgy.
Is Cherry Nail Design In Style Right Now?
Yes, cherry nail design has remained a consistently popular trend for several seasons, appearing frequently across nail art social media and in salon requests throughout spring and summer.
Can You Do Cherry Nail Design On Short Nails?
Absolutely. Cherry nail design works beautifully on short nails as long as the cherries are scaled down slightly and kept to one or two accent nails rather than a full, busy set.
How Long Does A Cherry Nail Design Last?
With gel polish and a proper top coat, cherry nail design can last two to three weeks, similar to any standard gel manicure. Regular polish versions typically last about a week before needing a touch up.
What Tools Do I Need For Cherry Nail Design At Home?
A thin liner brush, a small round or dotting tool, red, green, and white polish, your base colour, and a good top coat are all you need to attempt cherry nail design at home.
Is Cherry Nail Design Hard To Do?
It looks more difficult than it actually is. With a little practice using a dotting tool for the round cherry shapes, most beginners can achieve a decent cherry nail design within a few attempts.
What Is The Difference Between Cherry Nail Design And Cherry Blossom Nail Design?
Cherry nail design features the actual fruit, painted red with green stems, while cherry blossom nail design depicts the pink flowers of the cherry tree, offering a softer, more floral aesthetic.
Can Cherry Nail Design Be Done With Press On Nails?
Yes, many press on nail brands now offer pre designed cherry nail design sets, and you can also hand paint your own cherries onto blank press on nails for a custom look.
Final Thoughts On Cherry Nail Design
After years of painting cherry nail design across every nail shape, skin tone, and personal style imaginable, I can honestly say it remains one of my favourite requests to fulfil. There is something genuinely joyful about a little painted cherry sitting on someone’s fingertip, and that joy translates into confidence the moment a client looks down at their finished set.
Whether you choose a minimalist single cherry, a full 3D sculpted set, or a chrome finished statement design, cherry nail design offers something for absolutely everyone. It is playful without being childish, elegant without being boring, and versatile enough to follow you through every season of the year.
If you are thinking about trying cherry nail design for the first time, my honest advice is to start simple. Master the basic cherry shape, get comfortable with your highlight and shadow placement, and build from there. Before long, you will find yourself experimenting with your own creative twists on this timeless, sweet little trend, and that is really what nail art is all about.